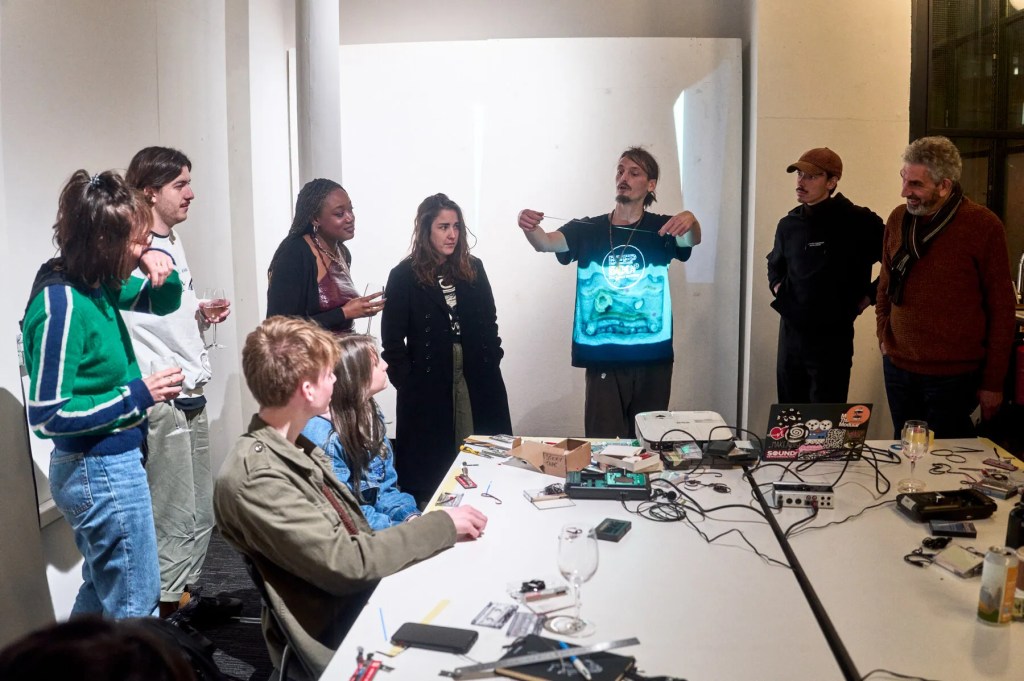
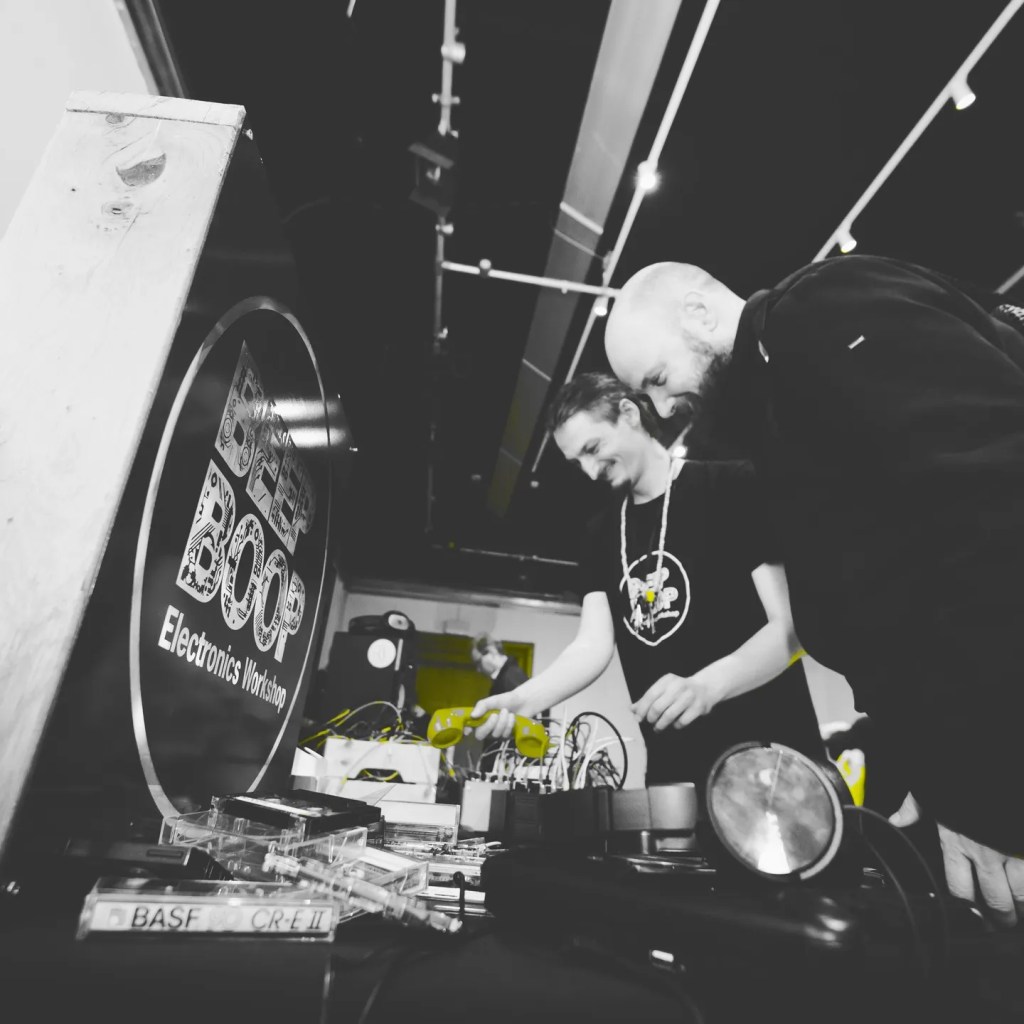
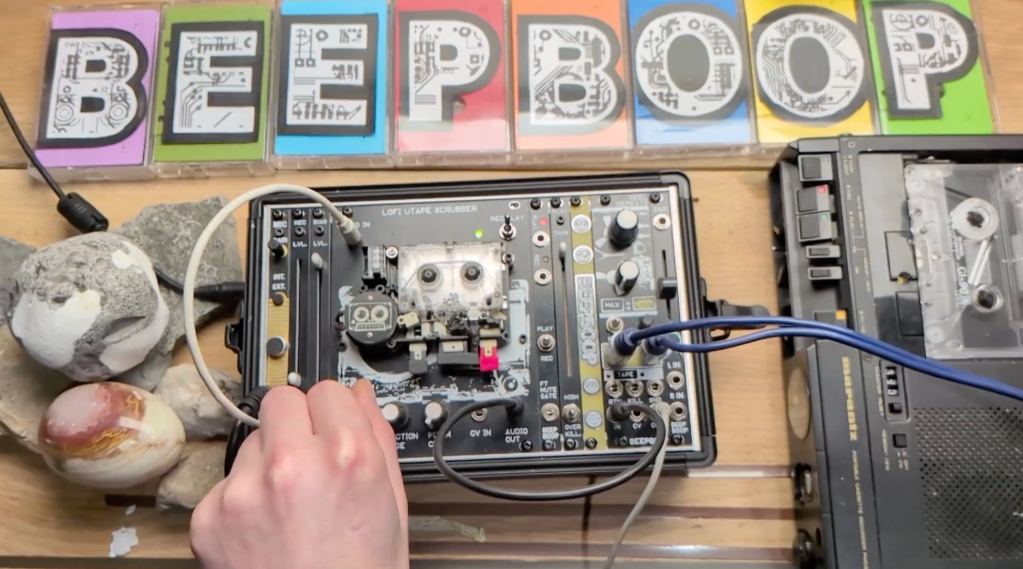
Join us on this upcoming Tuesday evening with Jack from Beepboop Electronics (UK), who will show you all ins and outs regarding tape looping, slicing, editing, tape deck modifying and more!
In this 3 hr get together on a Tuesday evening, we are working with a small group of just 6 participants to make sure there’s enough time to learn how to make, record, slice, splice, fix, break tape and make compositions with them and extended tape loop setups.
Tuesday 10-03 from 18:00-21:00
No materials needed, you get everything a the workshop
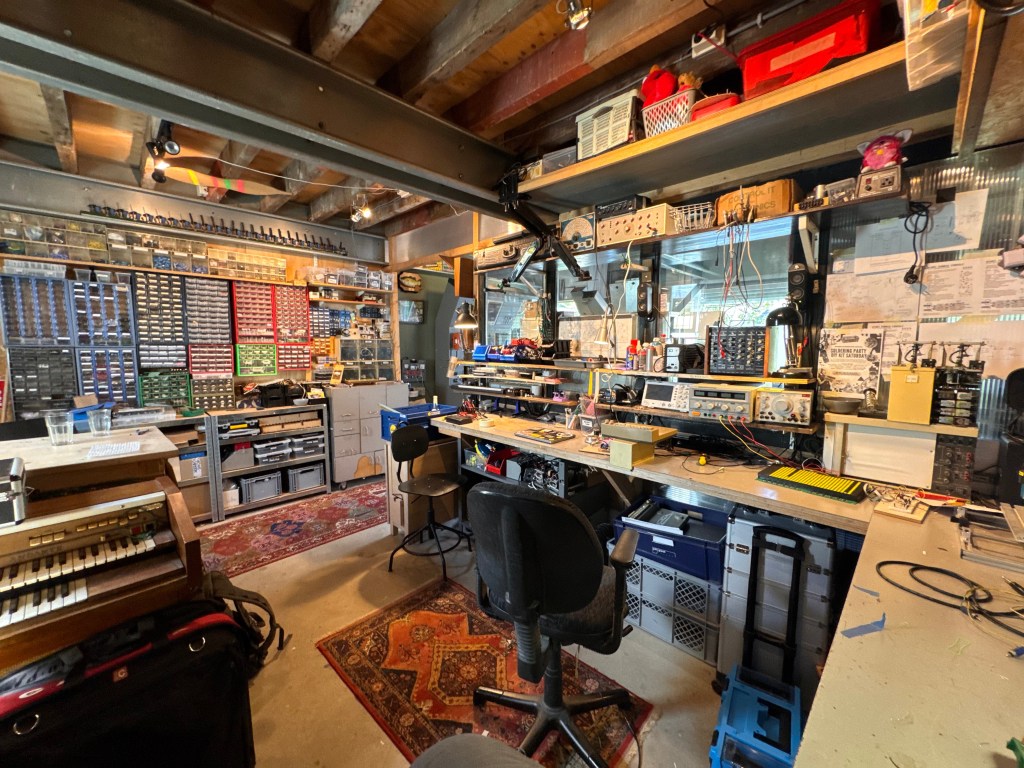
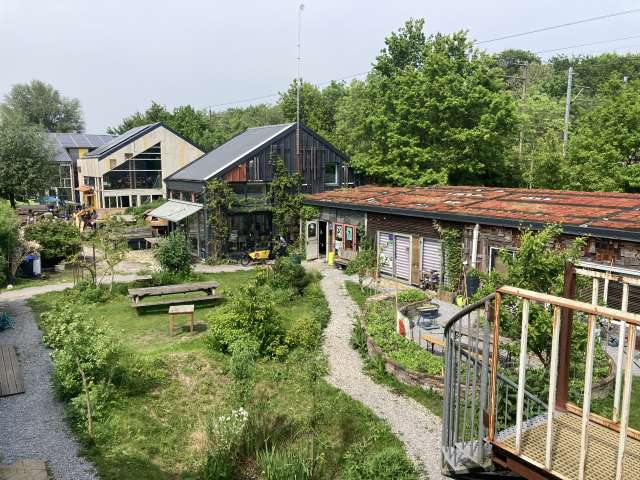
Acid Solder Club studio – Vlampijpstraat 94 – 3534 AR Utrecht – Netherlands
Beepboop Electronics is a tape loop maker focused on analogue tape manipulation, experimental electronics, and mechanical sound processes. By combining cassette technology, tape loops, and DIY circuits, he builds instruments that highlight the unique qualities of tape noise, texture, repetition, and movement.
These machines are designed for musicians, sound artists, and makers interested in tactile interfaces, experimental composition, and exploring sound beyond traditional instruments.
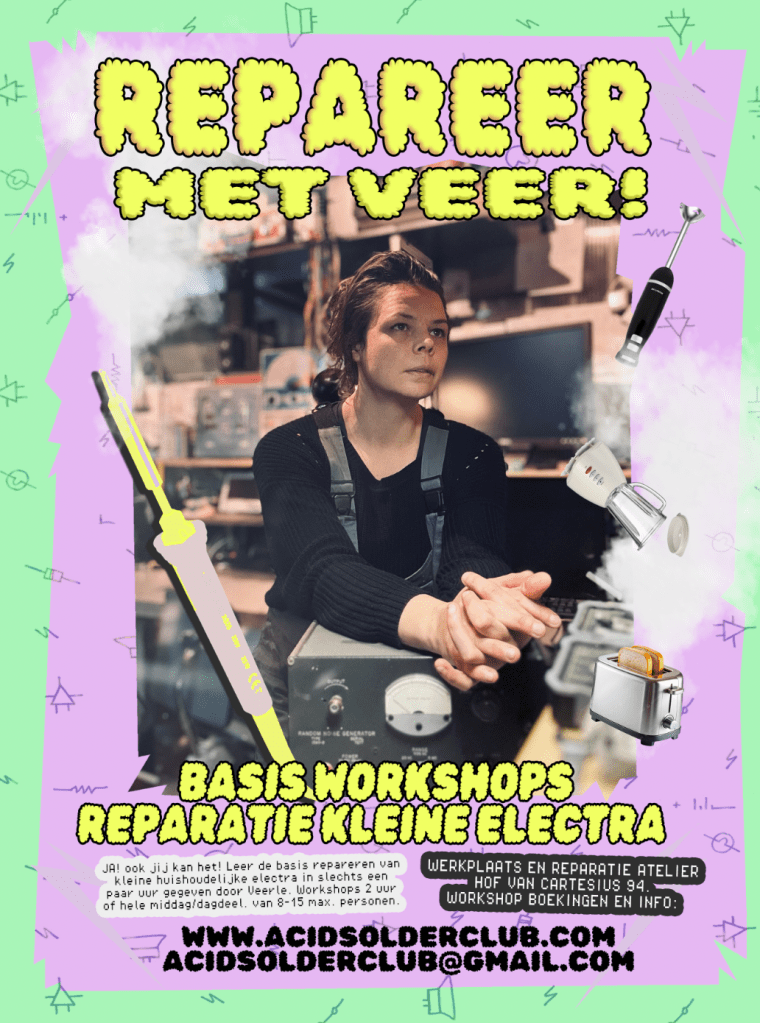
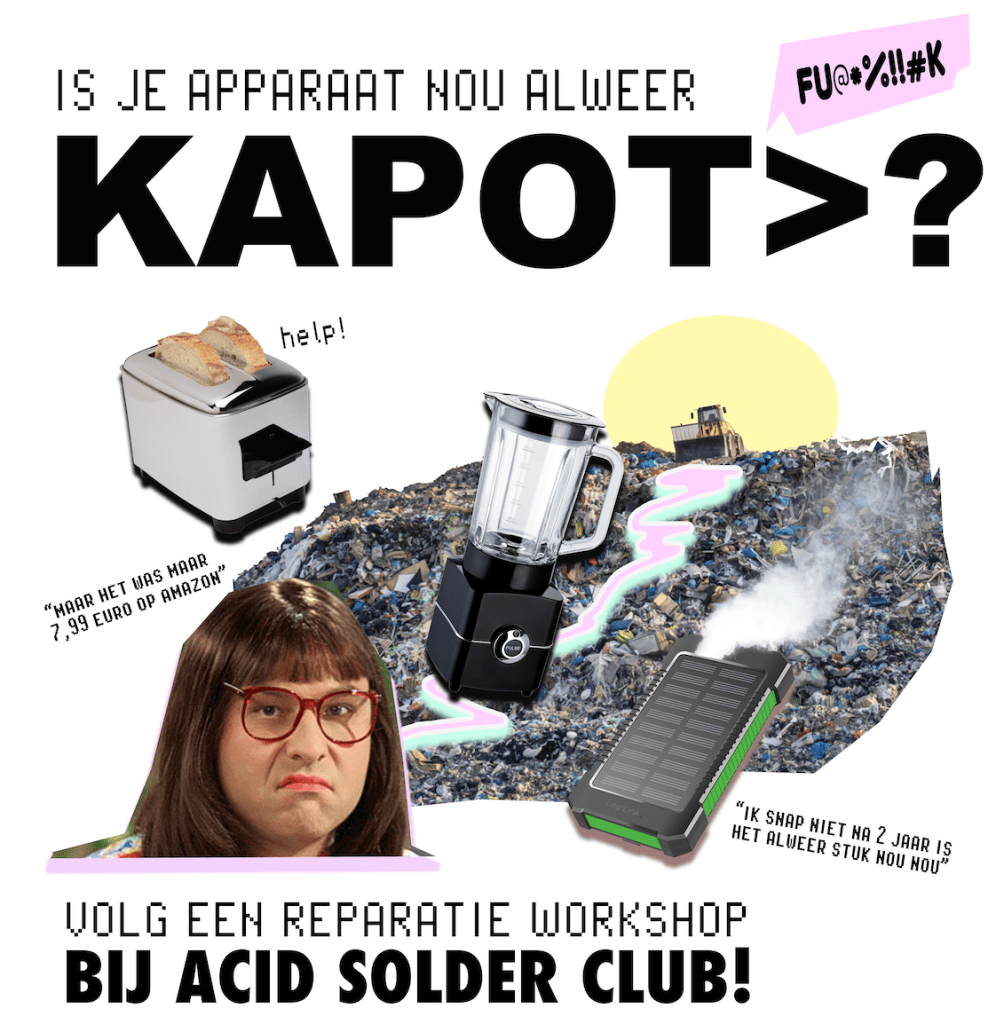
Basis Workshop Reparatie kleine Electra met Veerle Pennock van Acid Solder Club
Is je apparaat nou weer kapot?
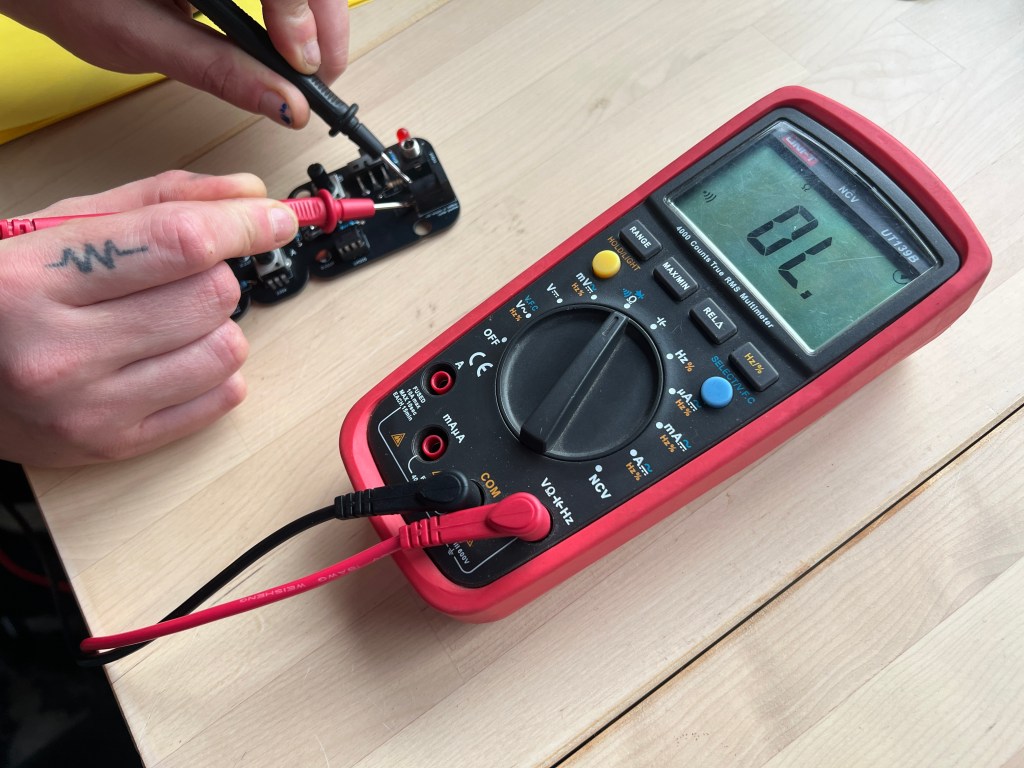
In deze middag hands-on cursus leer je hoe je kleine elektrische apparaten veilig opent, onderzoekt en waar mogelijk tijdens de middag ook zelf repareert! Veel apparaten worden weggegooid, terwijl het probleem vaak zit 1 onderdeel, zoals een kabel, schakelaar of zekering.
In deze cursus leer je herkennen wat nog te repareren is en wat niet, wanneer ga je zelf aan de slag? en wanneer laat het je over aan een professional? We duiken in de meest bekende reparatie gevallen en deze cursus is echt gericht op beginners, hobbyisten, muzikanten en makers die meer grip willen krijgen op de toekomst van hun geliefde apparaten. Maar ook voor ieder mens die willen begrijpen hoe apparaten werken en hoe je eenvoudige reparaties uitvoert met minimale middelen.
Iedereen kan leren repareren! zolang je maar weet hoe.
Wat leer je?
Veilig werken met elektrische apparaten
Hoe apparaten zijn opgebouwd (met en zonder printplaat)
Diagnose stellen: waar zit het probleem?
Veel voorkomende reparaties herkennen en uitvoeren
Wanneer je beter een professional inschakelt.
A taste of E-waste, wat kan je nog met apparaten wanneer deze niet meer te repareren zijn?
Als deelnemer krijg je naast de cursus ook de ACID SOLDER CLUB Repair Handleiding + Stappenplan
Opbouw cursus
Basis & Diagnose
Veiligheid en handige reparatie tools
Hoe lees je een apparaat (labels, spanning, risico’s)
JA! alleen niet allemaal… heb je een huishoudelijk apparaat of stuk consumenten tech wat (vermoedelijk) stuk is, dan kan je dit meenemen naar de workshop. Denk bijvoorbeeld aan: koffiezet apparaten, koptelefoons, oplaad kabels, tostiapparaat, speelgoed, radio’s, computers, føhns, blenders, strijkijzers, afstandsbedieningen en andere huishoudelijke meuk, maar GEEEEEENwasmachines en grote apparaten dan in een fietsmandje passen! Ook geen hele moeilijke high-end super gecompliceerde dingen als je peperdure HI-FI versterker of batterij-dingen als portable power banks (zijn niet open te krijgen = instant verdriet).
Repair for all!
Teamuitjes en in-company repair workshops
Ja dit kan ook, graag zelfs en gezellig met je team leren repareren en kijken wie van de afdeling de meeste repair skills kan bemachtigen! Wie wil er nou niet met zijn blote klauwen in een apparaat graven in plaats van jeu-de-boulen en naborrel met de afdeling?! toch?!
Mocht je interesse hebben in een reparatie workshop op maat voor je team of familie, stuur een mailtje naar acidsolderclub@gmail.com. Dit is mogelijk om te combineren met andere activiteiten op het Hof van Cartesius zoals een naborrel of post-repair snack bij Warmoes!
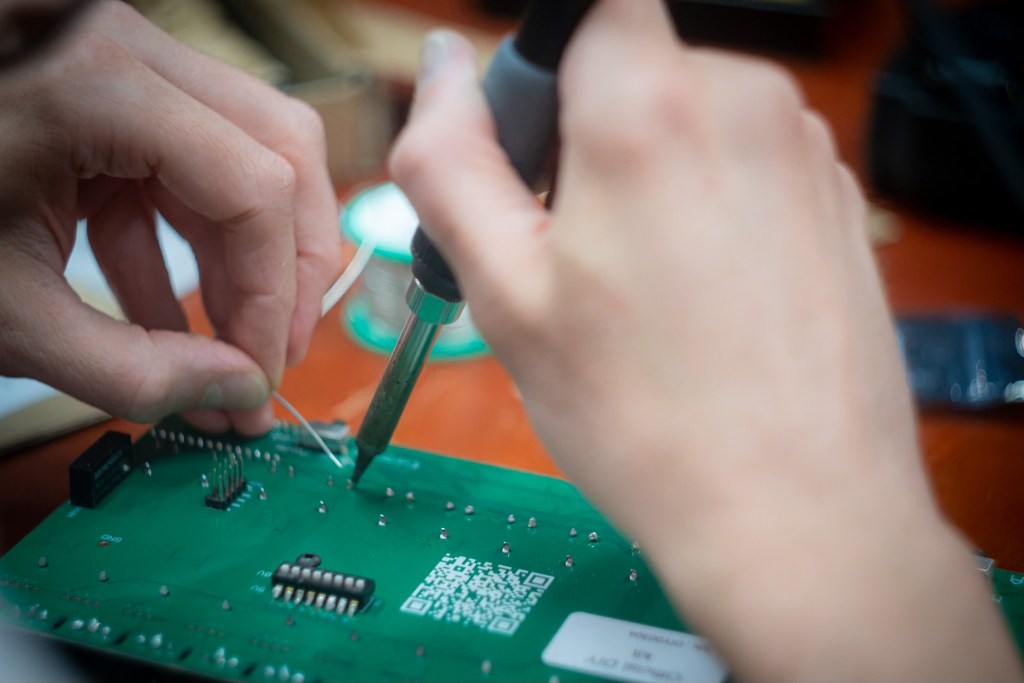
Learn step-by-step how to design a basic project PCB from start to finish, with this beginner KICAD workshop and kickstart your PCB manufacturing skills!
Ever wanted to turn your breadboard experiments into something a bit more solid? In this workshop we explore and follow a step-by-step proces of how to design your own circuit board using KiCad from schematic to PCB layout and ready to order!
Why design your own PCB?
Because it’s satisfying to make something that lasts longer than a breadboard project. 🙂 A PCB keeps your circuits stable, easy to share, and ready to reproduce in case you want to make copies for yourself, friends or to sell them. Whether you order it from a fabrication manufacturer such as JLCPCP or PCBWAY, or try etching it yourself, you’ll understand what’s really happening under the surface and that PCB making is not that difficult at all!
What you’ll learn:
KICAD software basics, library management, understanding the user interface
Building a simple schematic with a 555 timer circuit or oscillator drone circuit
Linking symbols in the schematic design, to pcb footprints
Routing traces and designing your layout in the PCB editor
How to make your own footprint and symbol from scratch
Basic design strategy and workflow of KICAD
Common beginner mistakes + insider tips & tricks
Interface and usability of our design
Intro in the PCB manufacturing process, post-design process
Lot’s of user examples and designed PCB’S from Acid Solder Club to examine
The workshop is suited for those who already have some prior knowledge in basics of electronics and components. This is not a beginner electronics workshop, but if you can read and understand basic schematic knowledge and circuit design it should be ok. When in doubt, contact Veerle on http://www.acidsolderclub.com for checking if this is something for you.
Practical info
These are 2 separate workshops, both workshops will be held in ENGLISH, but if your English is not so good, we can translate a bit in between course blocks when needed.
Coffee, Tea and Cookies included, bring your own Lunch!
All day long hands-on workshop with time for Q&A at the end.
For this workshop you need a PC with MacOS or Windows, and install the latest version of KICAD V9.0. via https://www.kicad.org/download/. preferable beforehand, otherwise make sure to be in time or arrive 10 mins earlier to install KICAD if your unsure of installing.
Location is Hof van Cartesius, Vlampijpstraat 94, Utrecht. It’s a short walking distance from Station Zuilen or OV biking/bus distance from Utrecht Central Station. Parking is free between 11:00-06:00 in Vlampijpstraat.
REGULAR PRICE €65,-
STUDENT PRICE €50,-
Workshop limited in space (8 people) for small class courses.
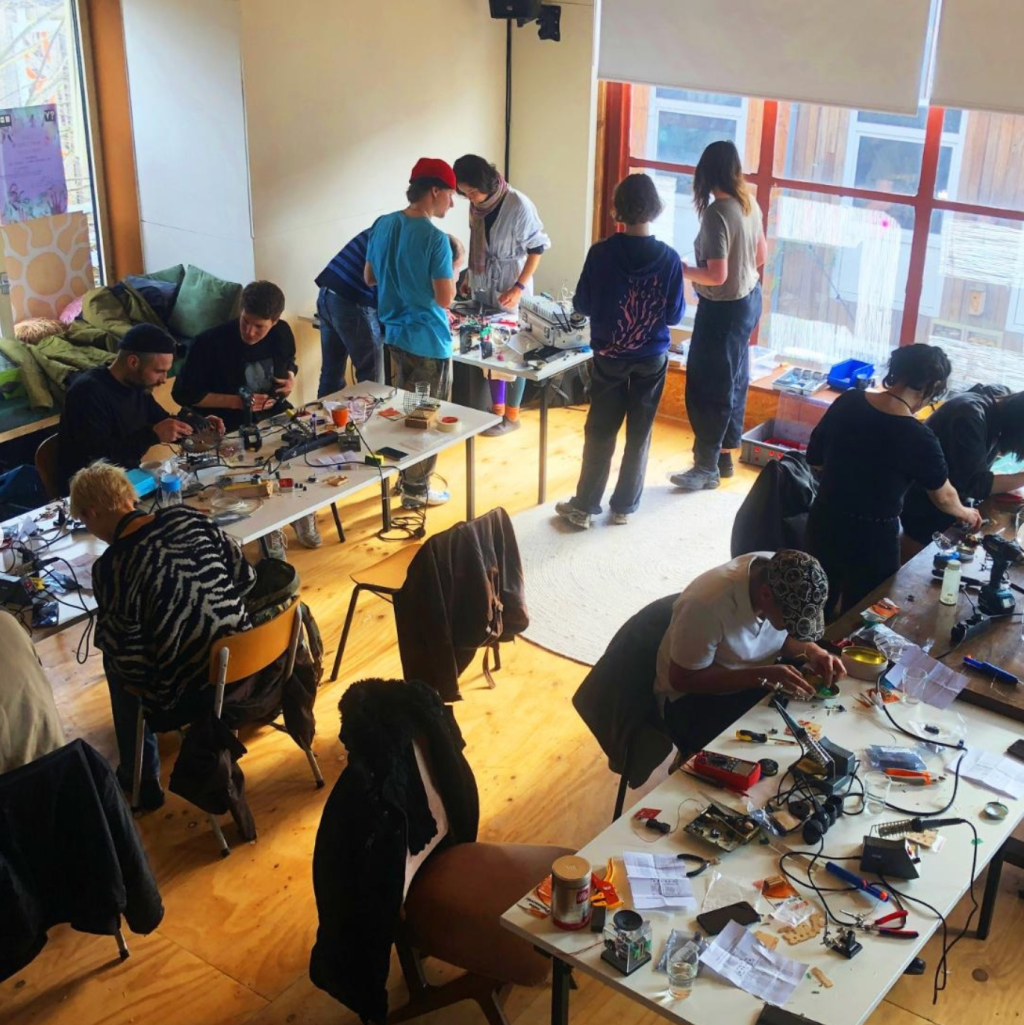
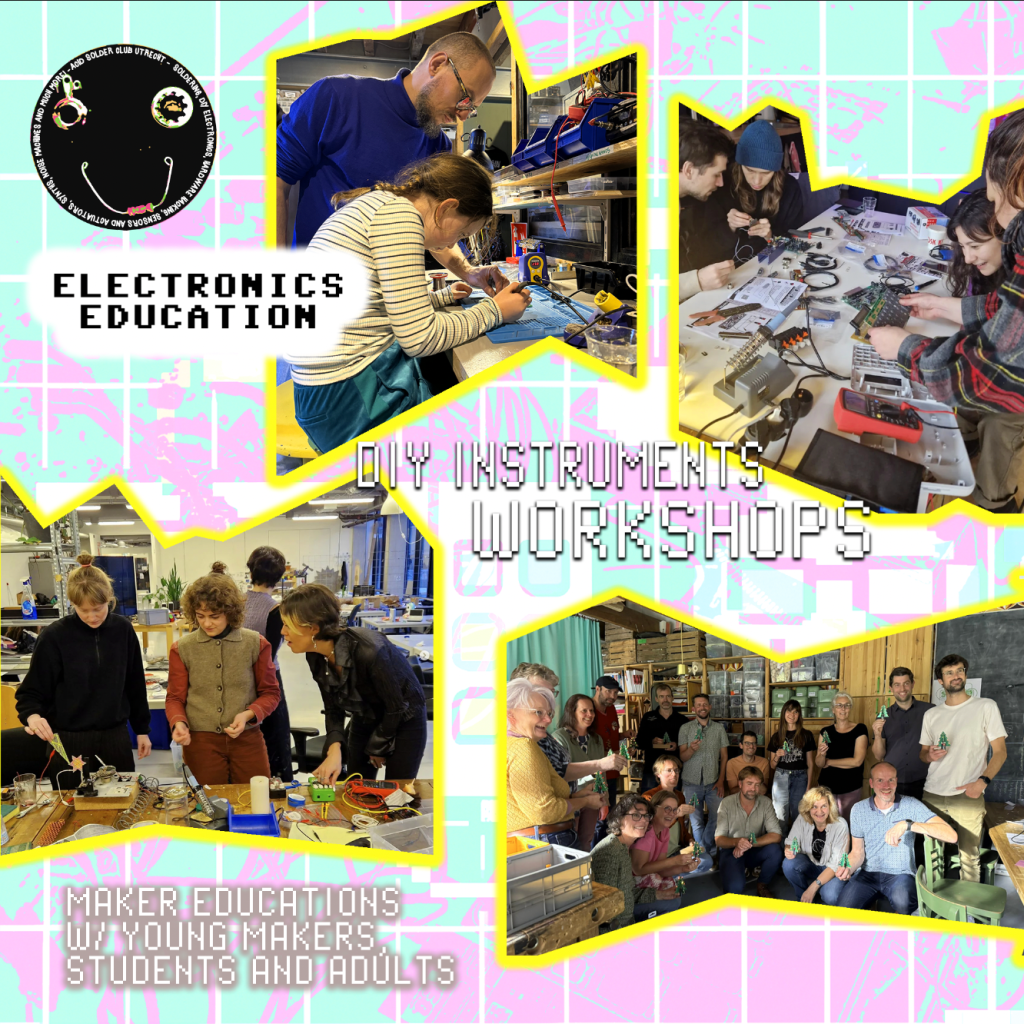
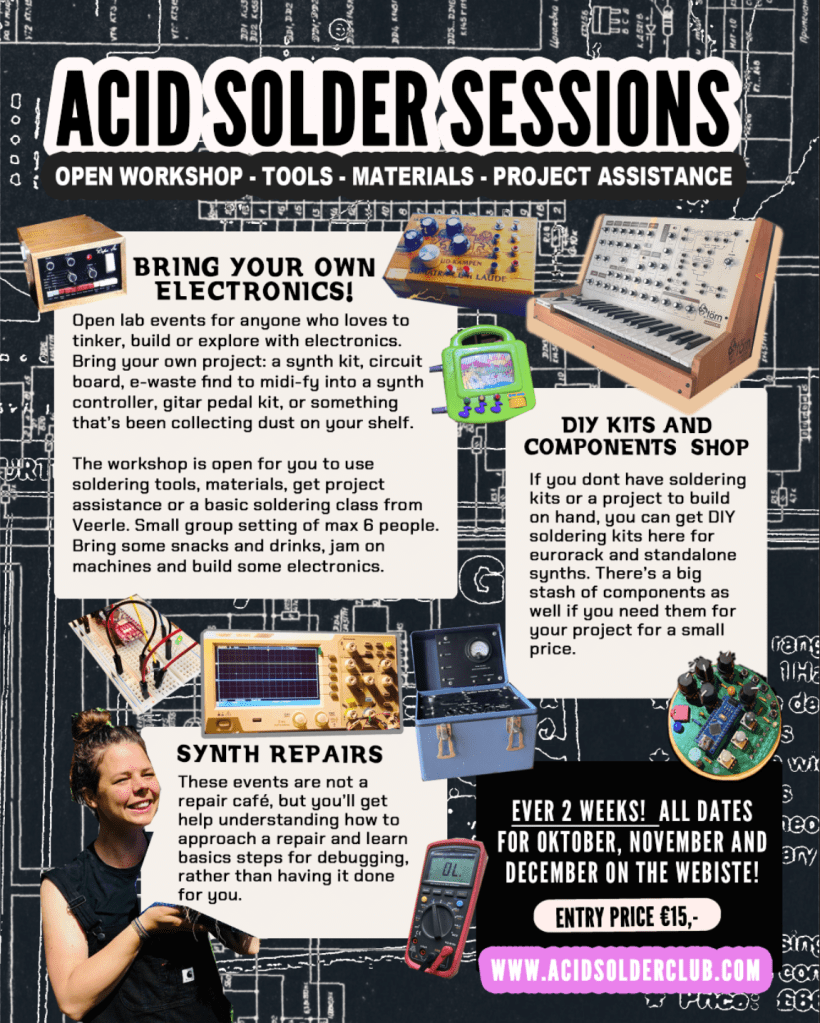
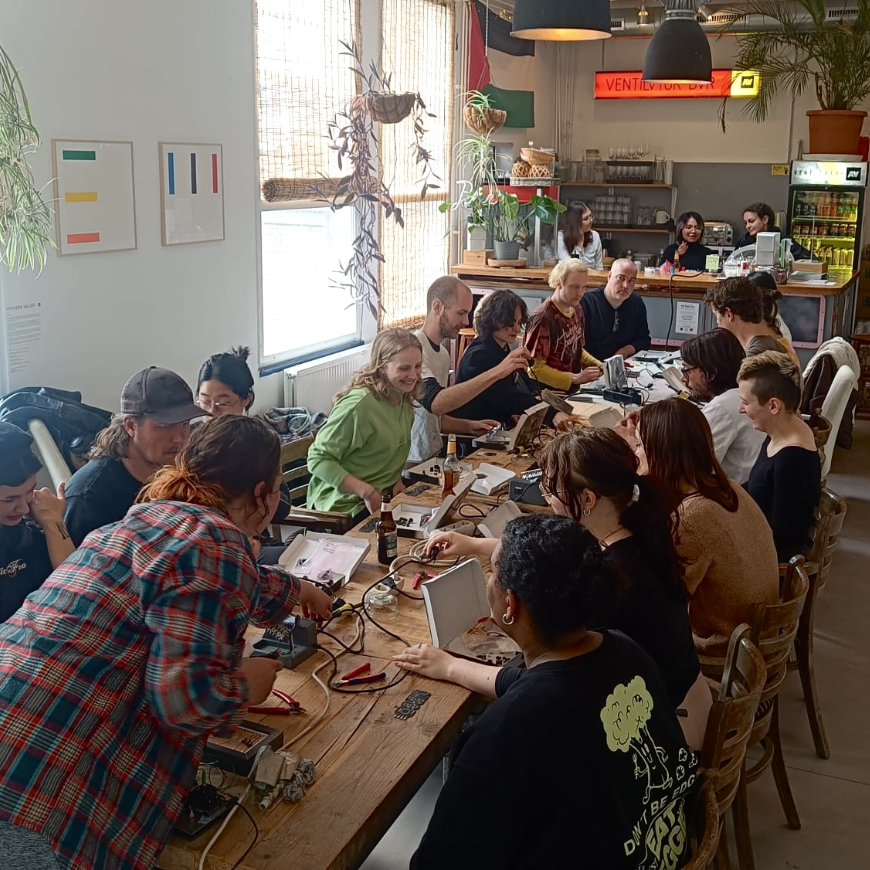
Reoccurring open workspace event for makers, designers, musicians, engineers and those who wants to give soldering and DIY electronics a try
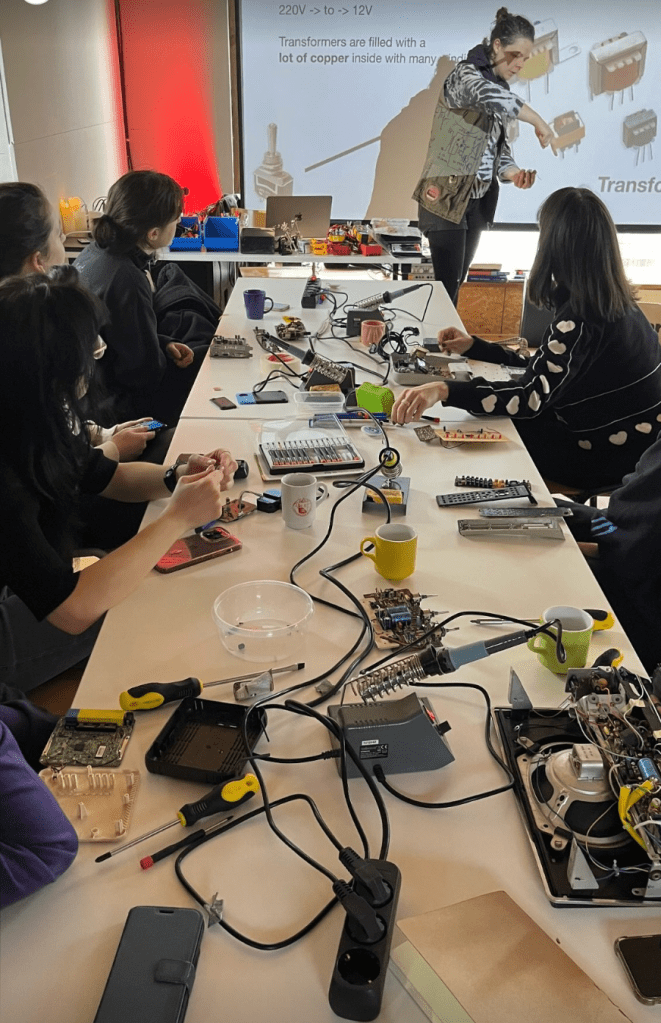
Every other week, Acid Solder Club opens the doors of its workshop in Utrecht to those who are curious about DIY electronics, soundmachines, guitar pedals, soldering and the art of building things yourself. The DIY sessions are part of a growing community in Utrecht and the area where we share knowledge, creative experimentation and provide an accessible learning location for circuit design and electronics.
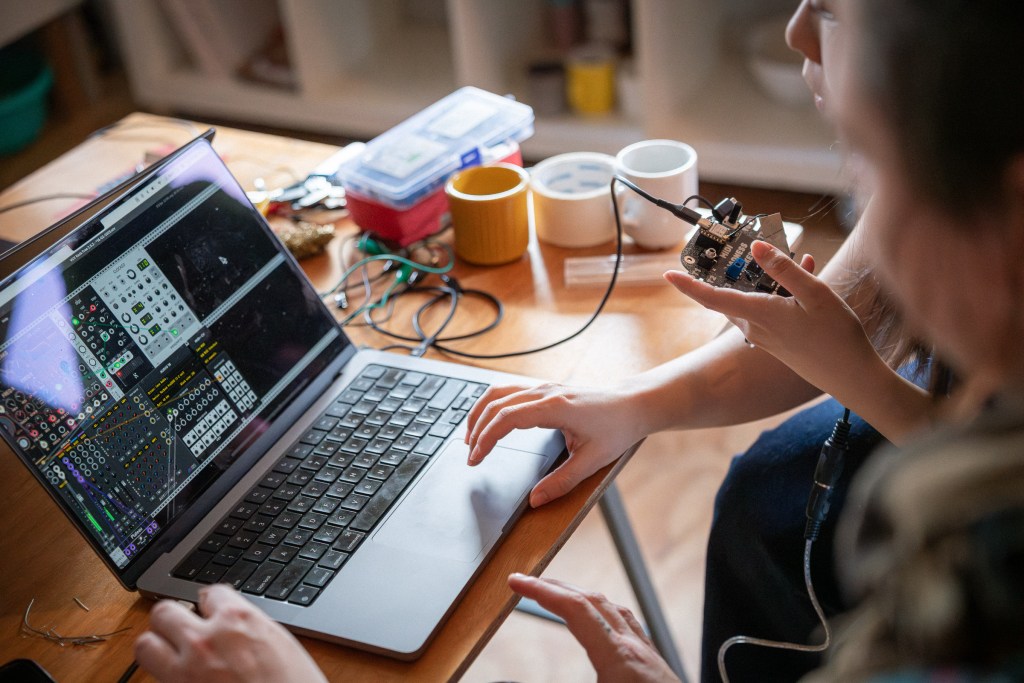
Each solder session is an open lab environment with benches ready, tools available, and a relaxed atmosphere where you can dive into your own project, get feedback, or simply explore how things work and jam out on some machines of the Acid Solder Club studio. Whether you’re repairing a synth, soldering a small circuit or designing your first PCB, this is a space to learn and meet likeminded others.
What to expect
You’ll find spots to work in the workshop with a small but well-equipped lab, and others who are just as curious as you are. Bring your own project, or pick up one of the DIY kits available from the DIY KIT STORE, if you’d like to start something new. You can ask for availability of kits via e-mail (acidsolderclub@gmail.com) Some participants come to build instruments, others to learn electronics from scratch, and some simply to enjoy a few focused hours surrounded by like-minded people.
About repairs
It’s not a repair café, but if you have something you want to fix, bring it and you’ll get hands-on guidance in how to approach a repair or a build. Learning the process and knowing where to find a repair option, rather than getting it fixed on the event.
Details
€15 entry per person, this helps the workshop to stay alive and thrive in Utrecht and helps with knowing who will come and what to expect! If you are unable to pay entry, you can apply as a volunteer on the day of the event via email, and help out with workshop to-do’s! Coffee and good vibes included, bring your own drinks and snacks.
Max 6 participants: limited tickets per event, it’s a small group learning experience where some people work individual on their project, some want to learn the basics or ask questions.
Time, date, location
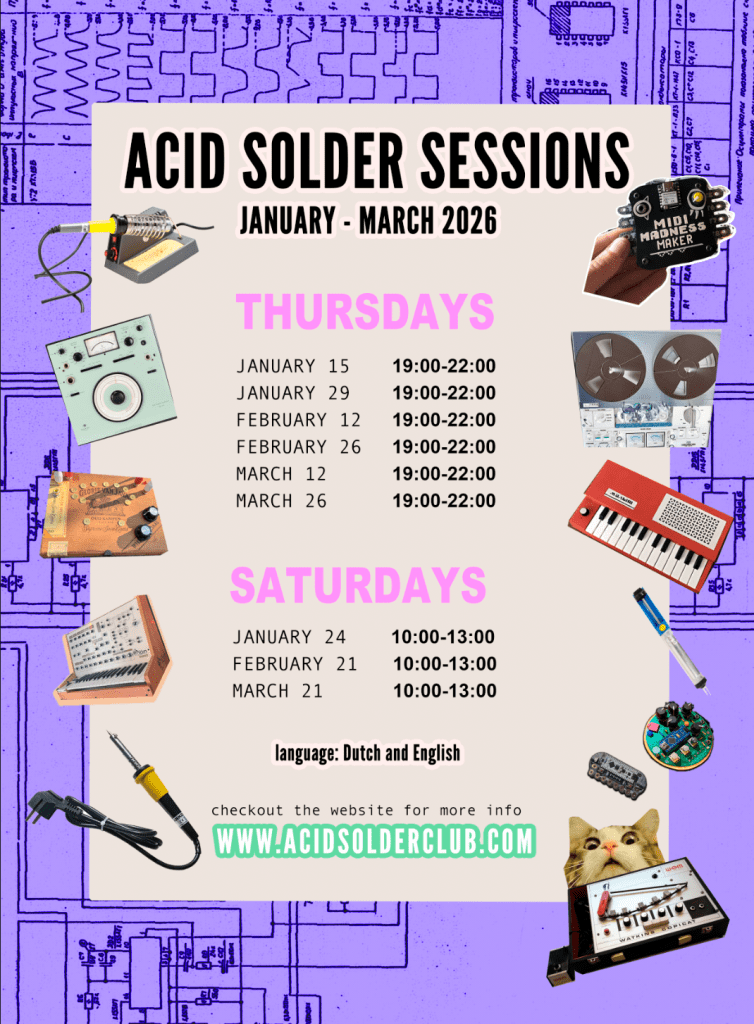
Acid Solder Club workshop is based at Hof van Cartesius, Vlampijpstraat 94 Utrecht. Trains stop at Station Zuilen and a busstation are both on walking distance. Parking is free in the weekend (do double check though)Solder Sessions are held on Thursday evenings and weekend mornings,check the schedule above and on the ticket website for the right days and times.
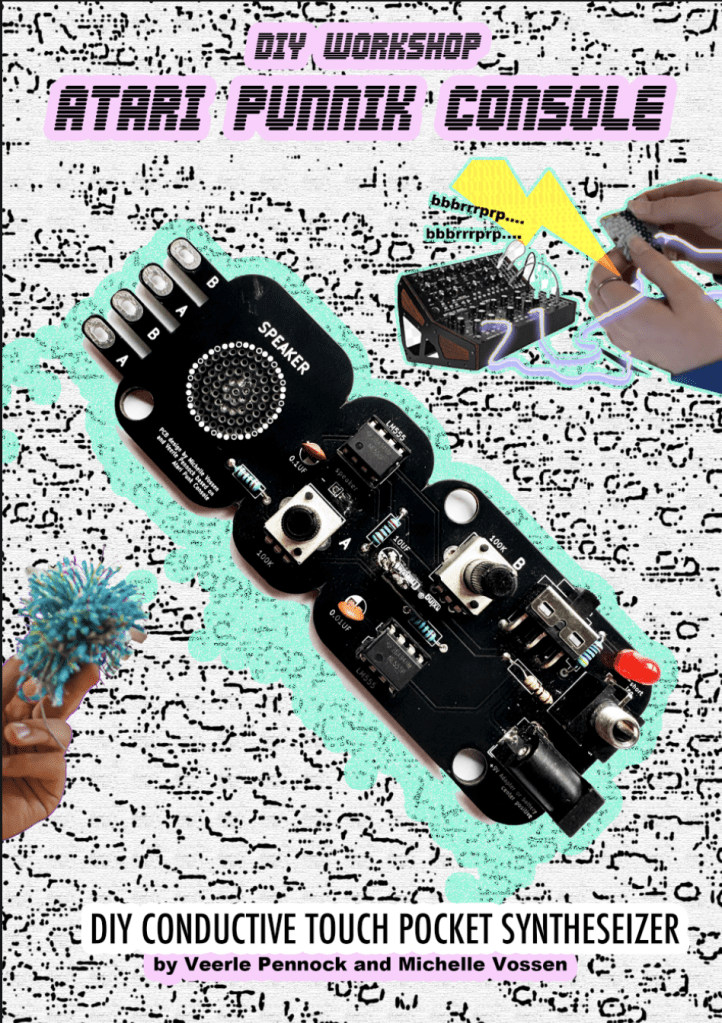
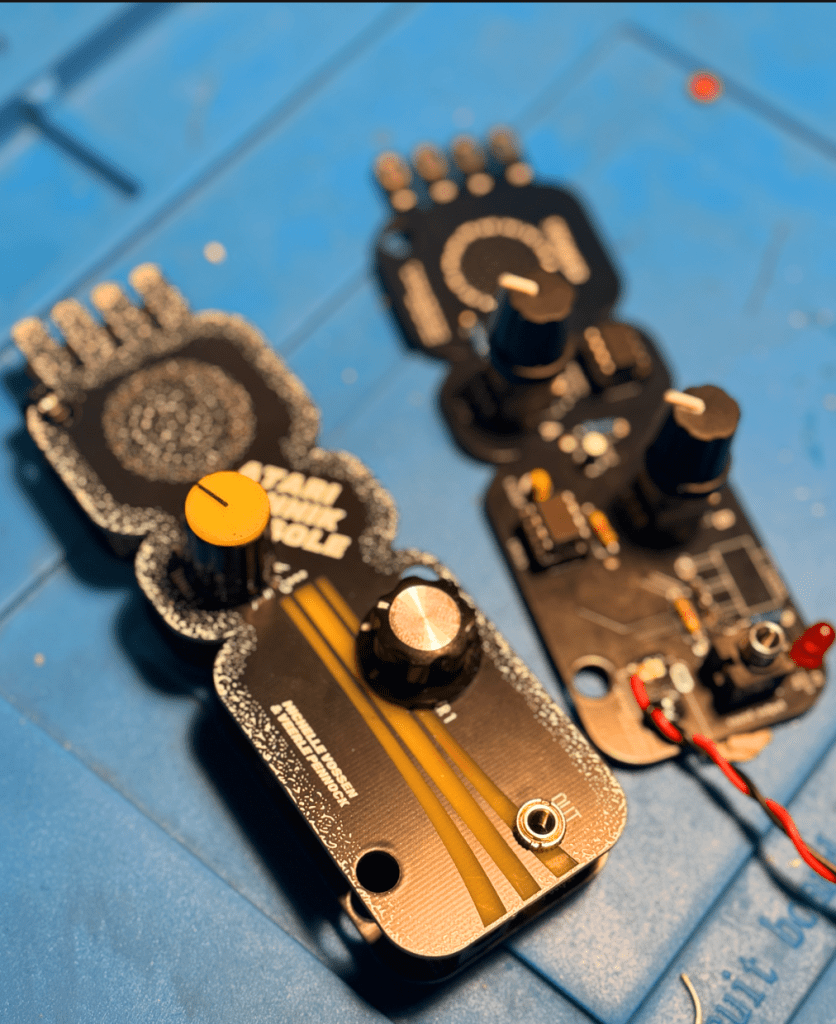
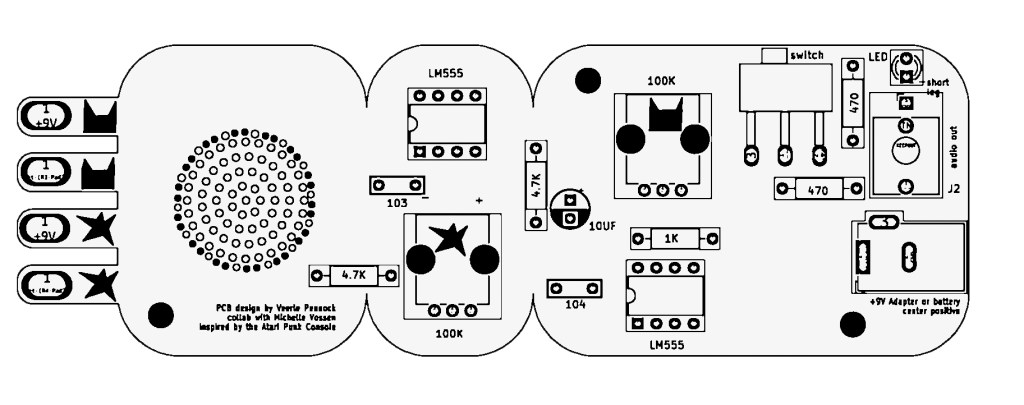
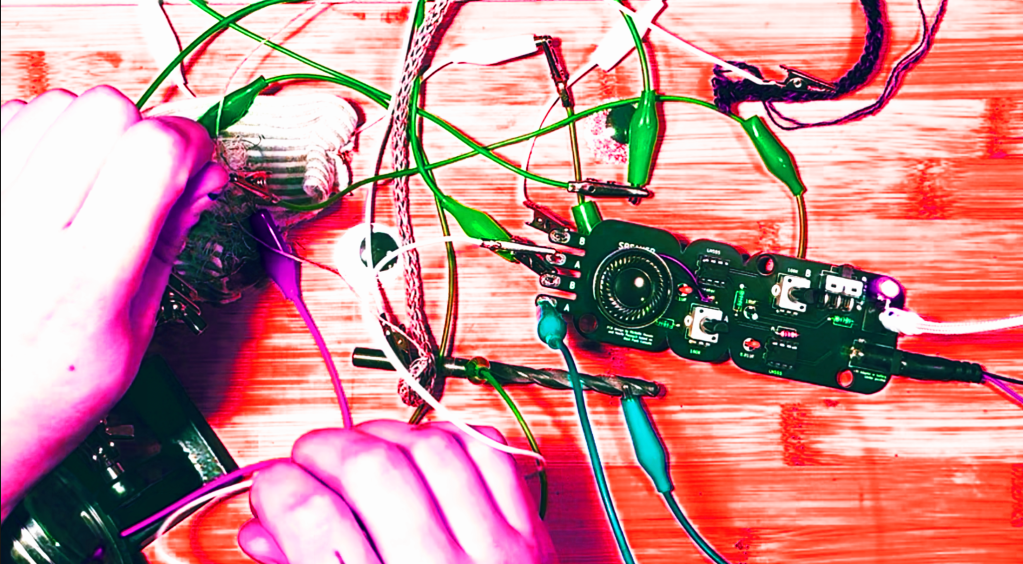
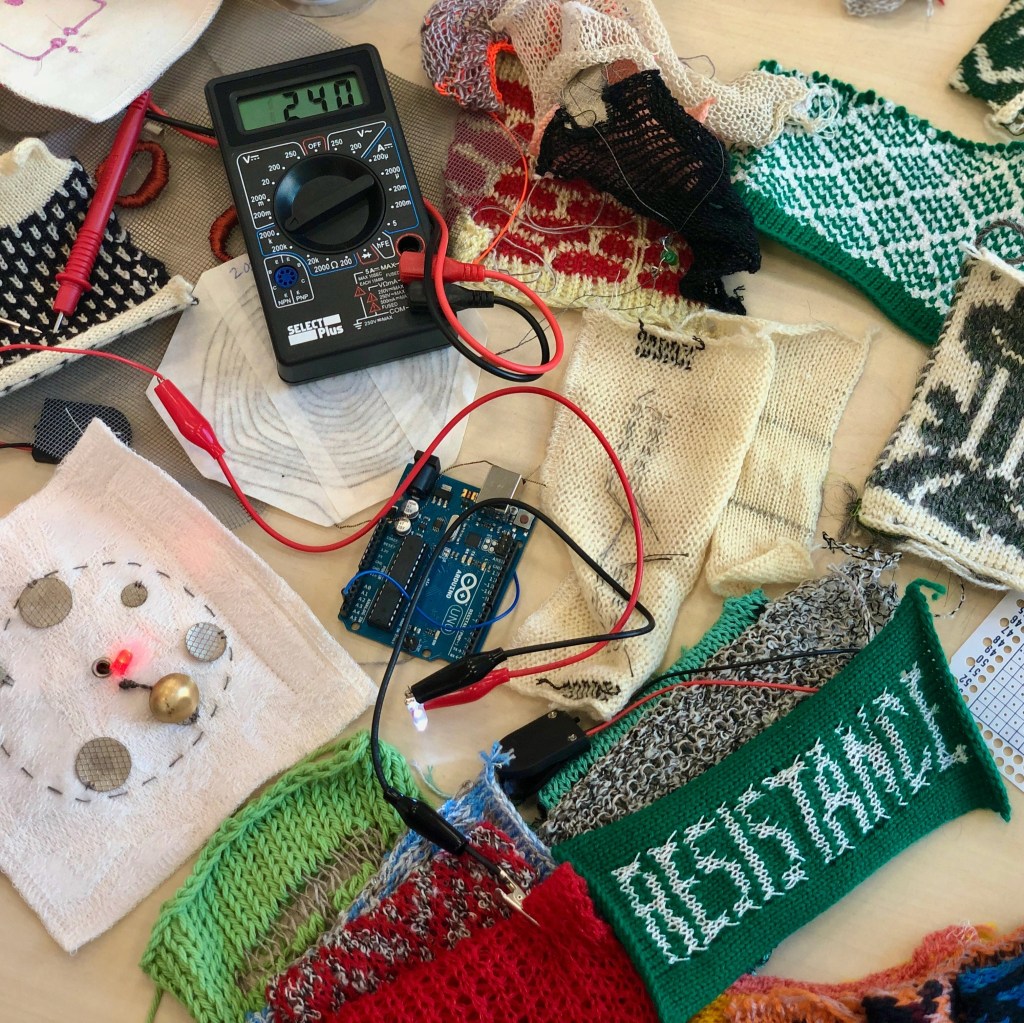
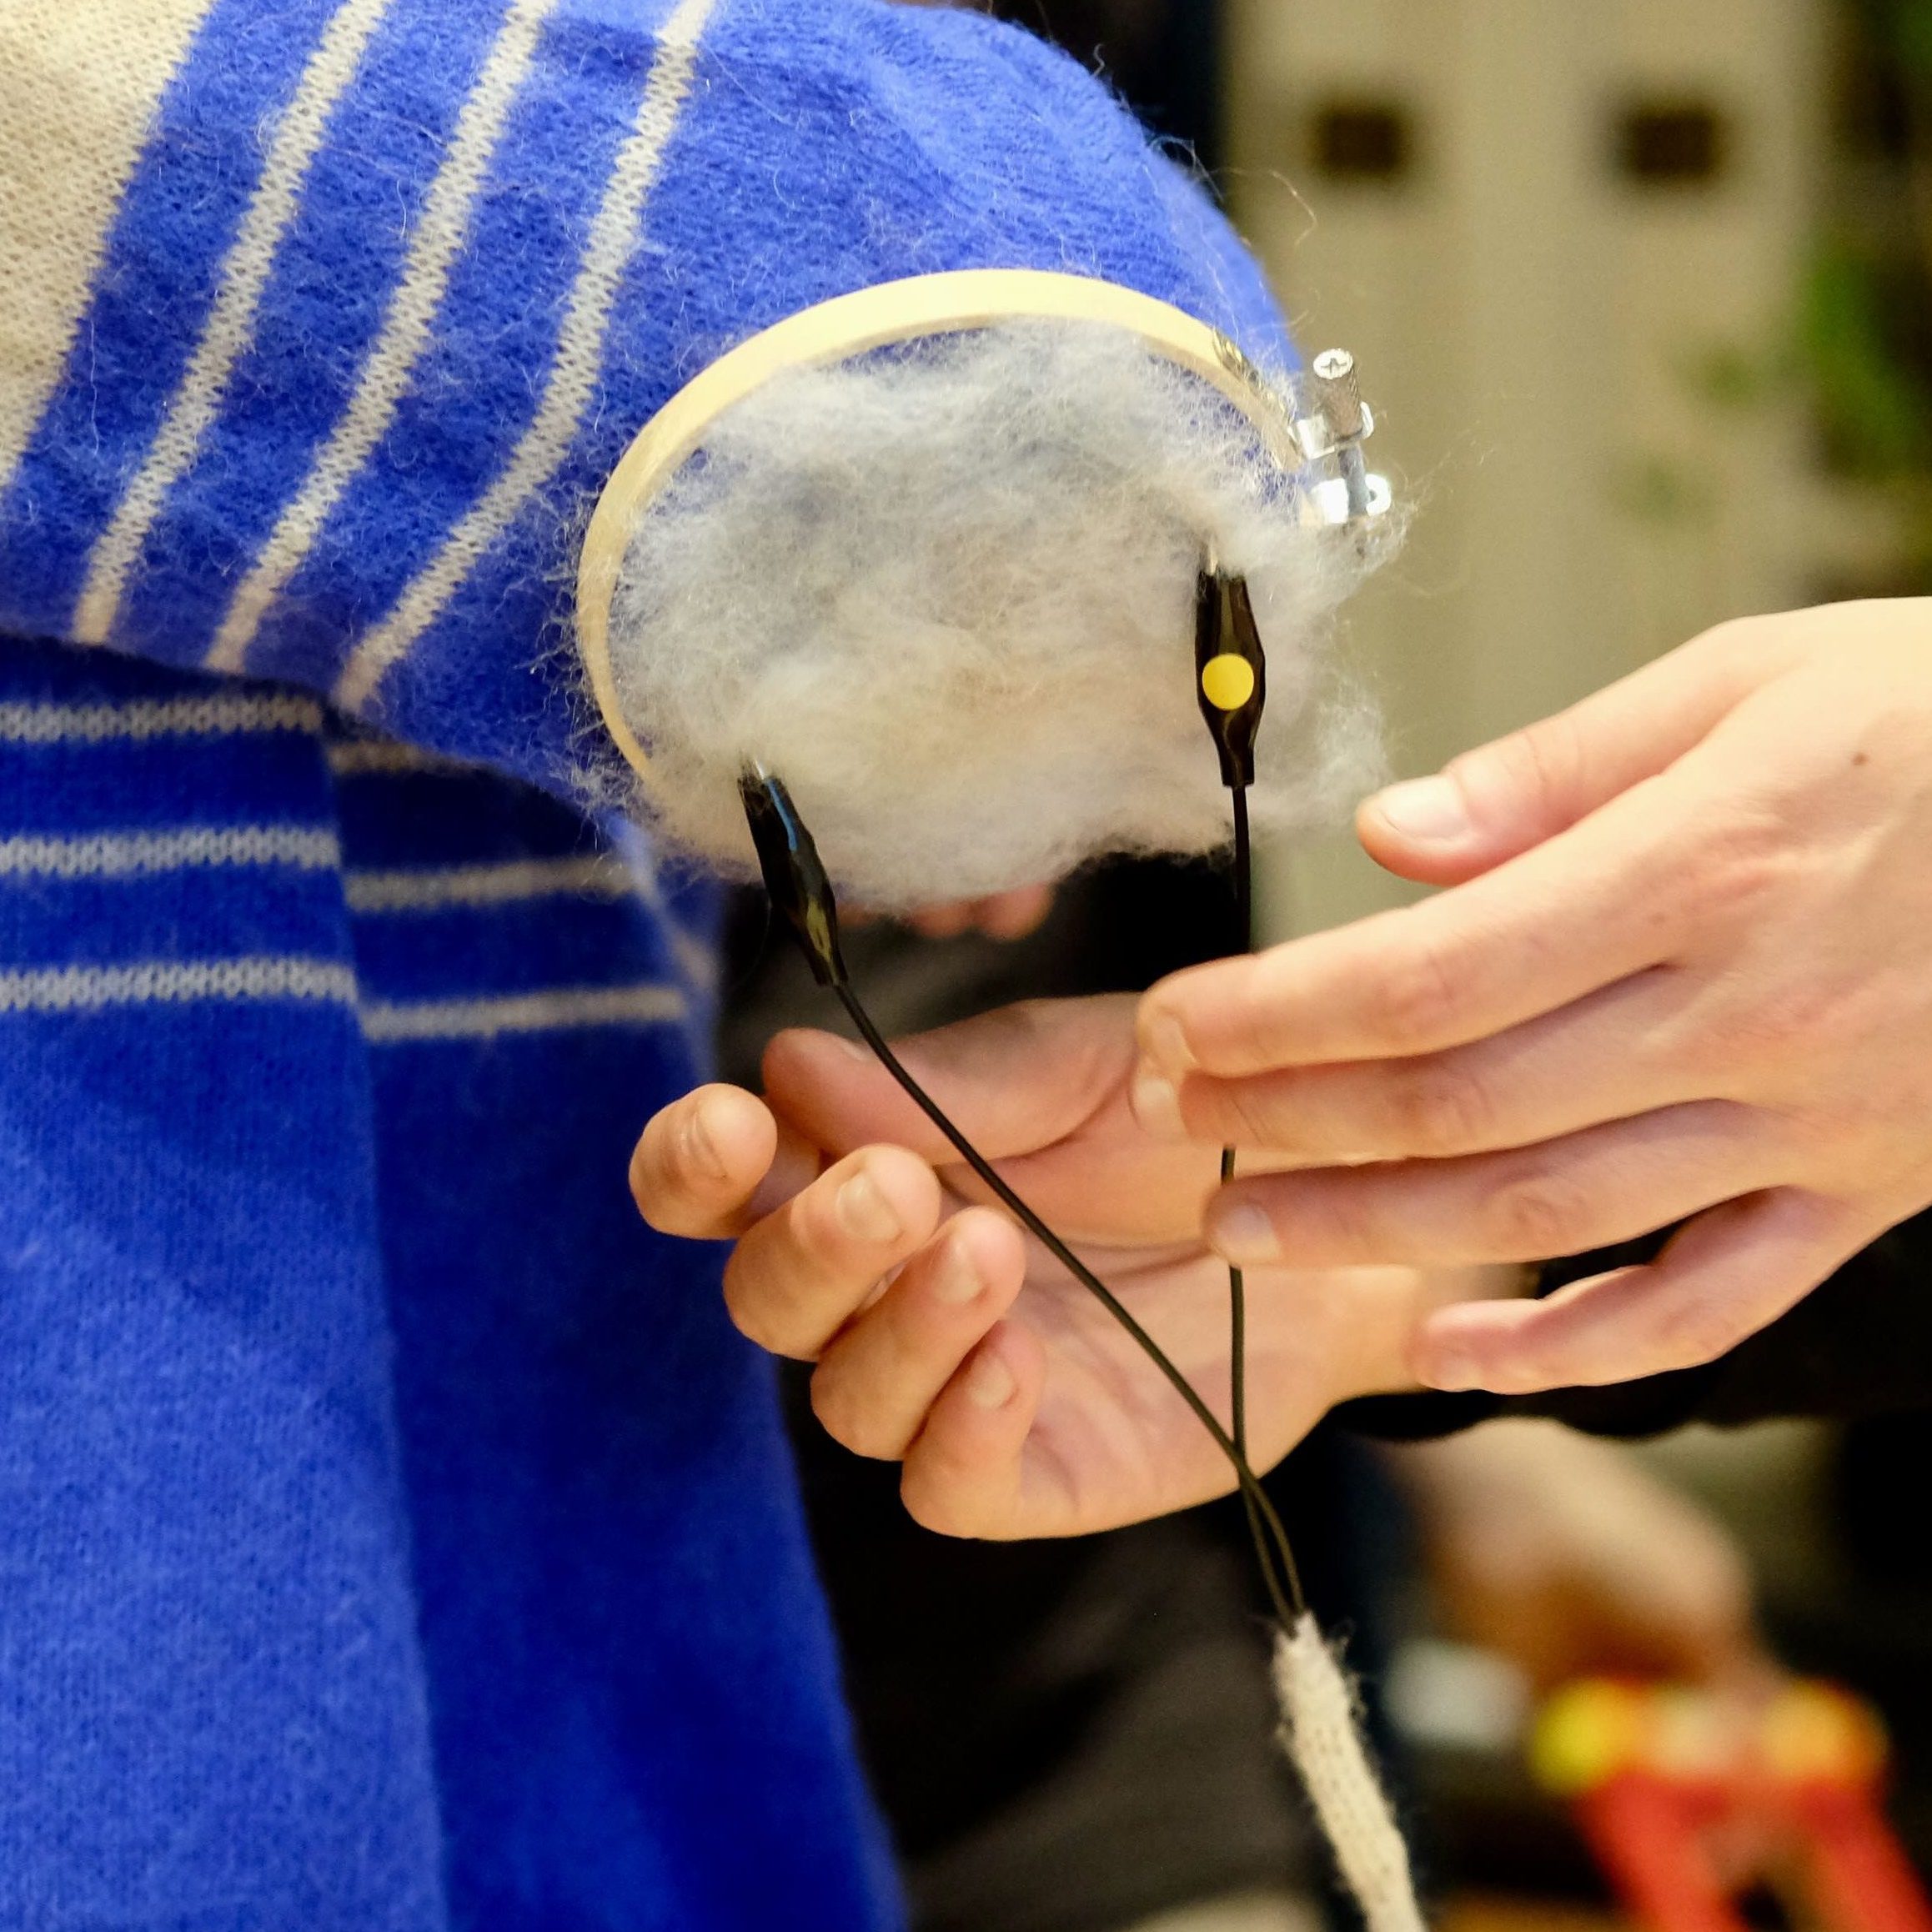
The Atari Punnik Console is based on the famous and well known “Atari Punk Console” diy beginner synthesiser circuit, and works the exact same way, accept it is modded and re-designed to work with touch and conductive materials such as E-textiles, conductive yarn, nails, screws, copper, random dead electronics and body contacts.
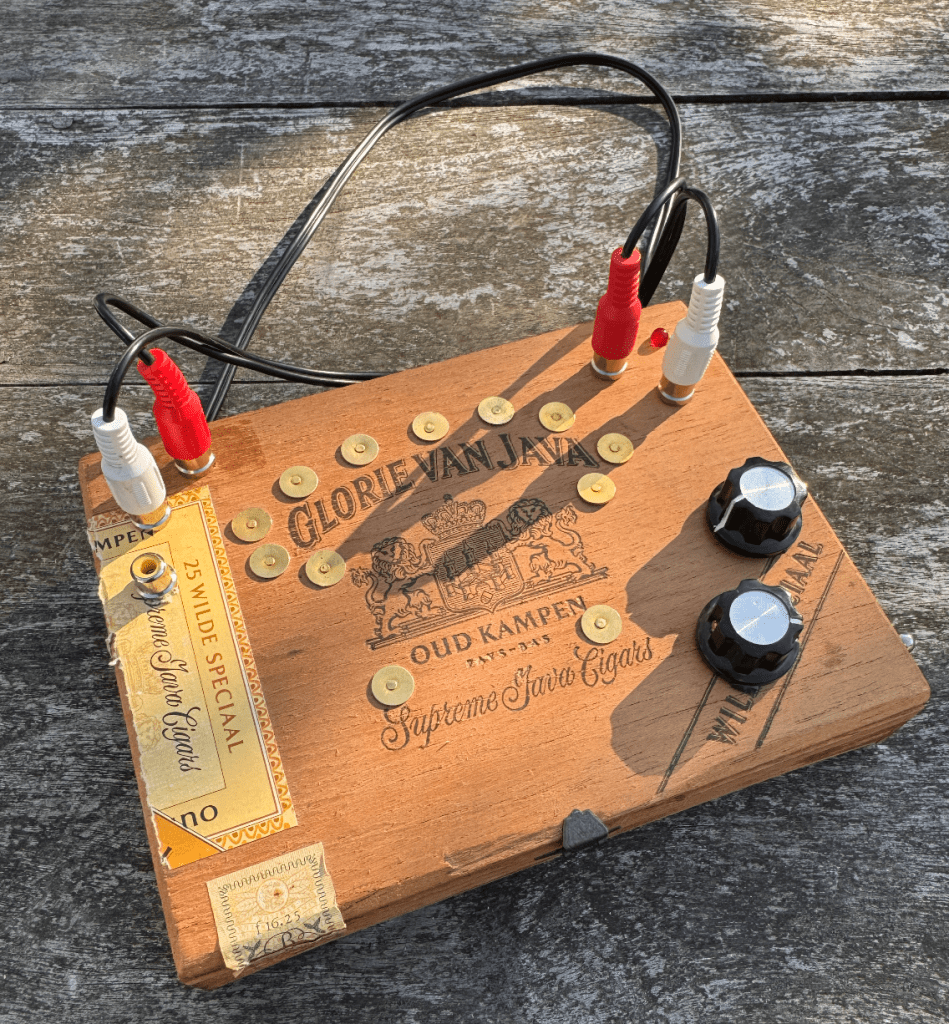
Atari Punnik Console inside cigar case enclosure
The Atari Punnik Console is inspired by a knitting tool called a “Punnik Poppetje” in Dutch, which is a wooden tool used for making certain knits. This kit is the perfect sonic pocket annoyance for kids and adults looking into getting more soldering experience, for seasoned noisemakers who want to involve touch sensing into their live sets, or synth parents wanting to get their kids involved into synth DIY and soldering.
The kit is developed in 2025 by Veerle Pennock and Michelle Vossen in 2024.
Conductive Paint (such as Bare Conductive paint or make your own)
Conductive Charcoal and/or Pencils
Electronic components such as Potentiometers, Faders, Rheostats, Force Sensitive Sensors, Thermistors (temperature sensing), Bendable Flex Sensors.
You can connect these sensors in series with each other, so one after the other. As long as you keep the signal flow from A->A separate from B->B. or in Version 2. of the APC keep the CAT icons and STAR icons together. (more on this in the build doc)
Build Documents
here you find the build doc for soldering the Atari Punnik Console V1.0.
here you find the layout for the Atari Punnik Console V2. You can follow the same build guide as V1.0, the biggest change is we changed the sensor connections A and B to illustrations of cats and stars to make it easier to know what needs to be connected with what.
Test your unit and connect a bunch of random conductive materials in-between the signal paths! As long as the CATS are connected to the CATS and the STARS to STARS in the end ..you can add as much conductive shizzle in between!
E-Textiles? What?
The world of E-textiles is another rabbit hole in this universe to fall into, and if you want to know more about that you can visit one of our favourite websites for references and project ideas regarding E-textiles you can visit this massive online repository:
Michelle and Veerle have taken the Atari Punnik Console to various festivals, workshops and cultural gatherings of all sorts over the last year. Some practical information if your interested in a beginner soldering workshop by us:
The Atari Punnik Console can be build in 1-2 hours depending on age and soldering speed
The kit is suitable for ages 12yr and older.
The DIY kit comes with all the components needed, and some extra materials for making your own tactile sensors and conductive interfaces, and a set of alligator clips.
The APC is a great learning tool for young kids and students, where we dive into: the basics of electronics, what it means to make an electronic circuit, how conductivity works and why things work and why they don’t work?
We offer education packages for teachers and self-thought educators for some of the DIY kits so you can solder them with participants, even when we are unavailable to give the workshop ourselves in person. Get in touch with acidsolderclub@gmail.com about this if you’re interested in hosting a soldering workshop using the APC.
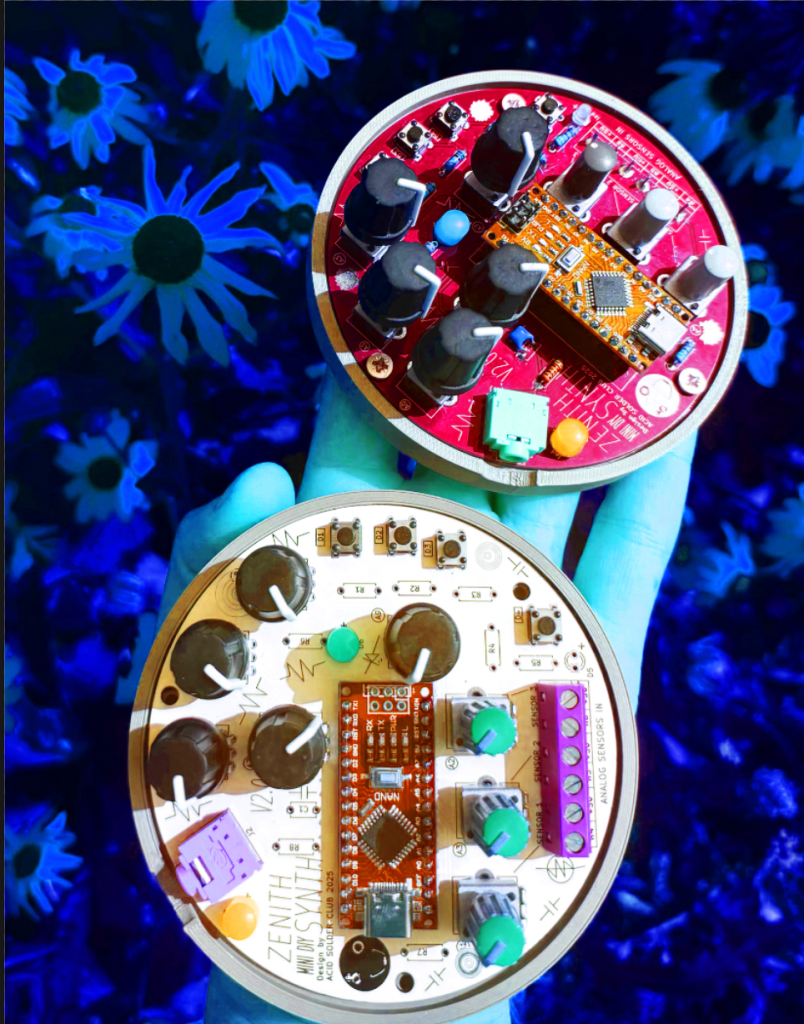
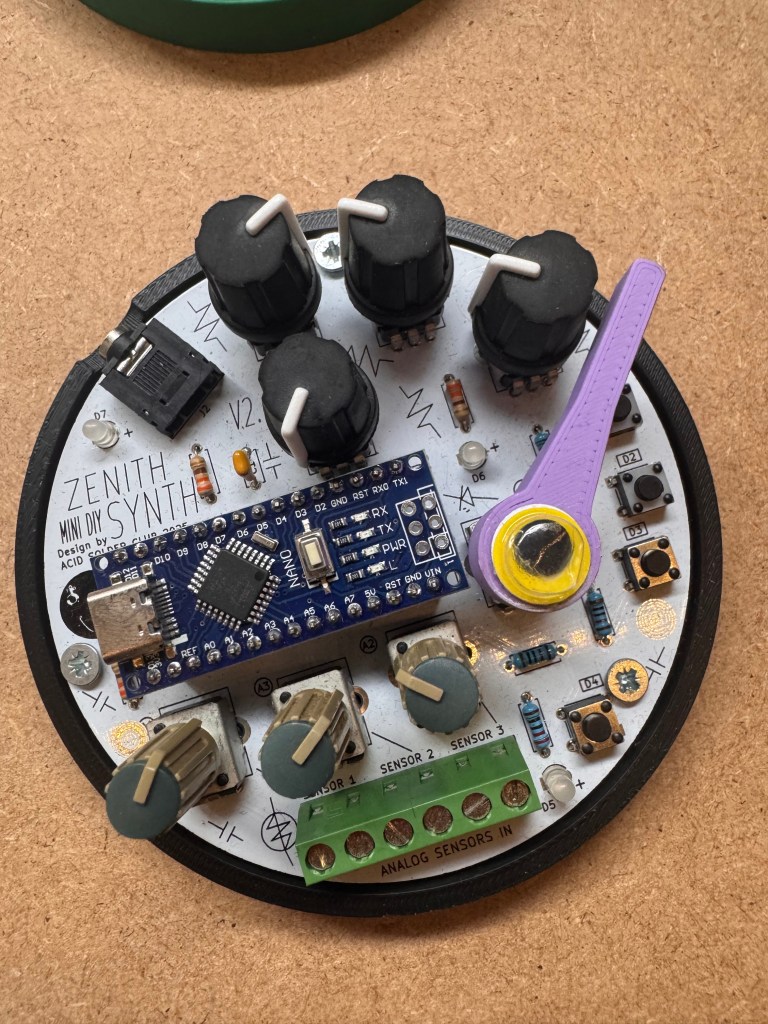
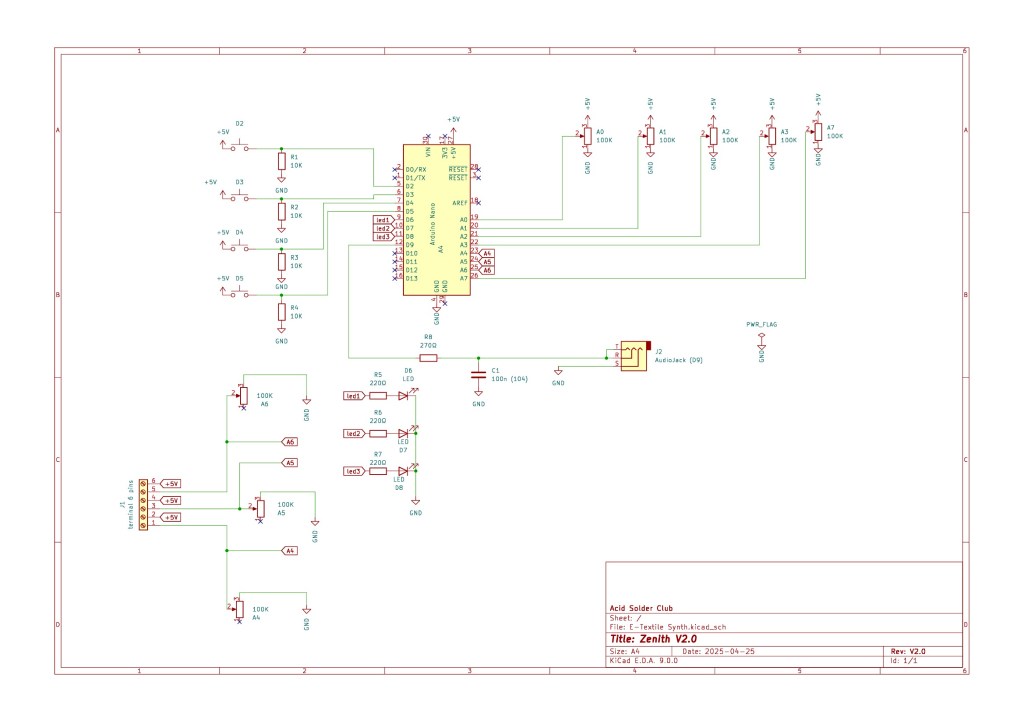
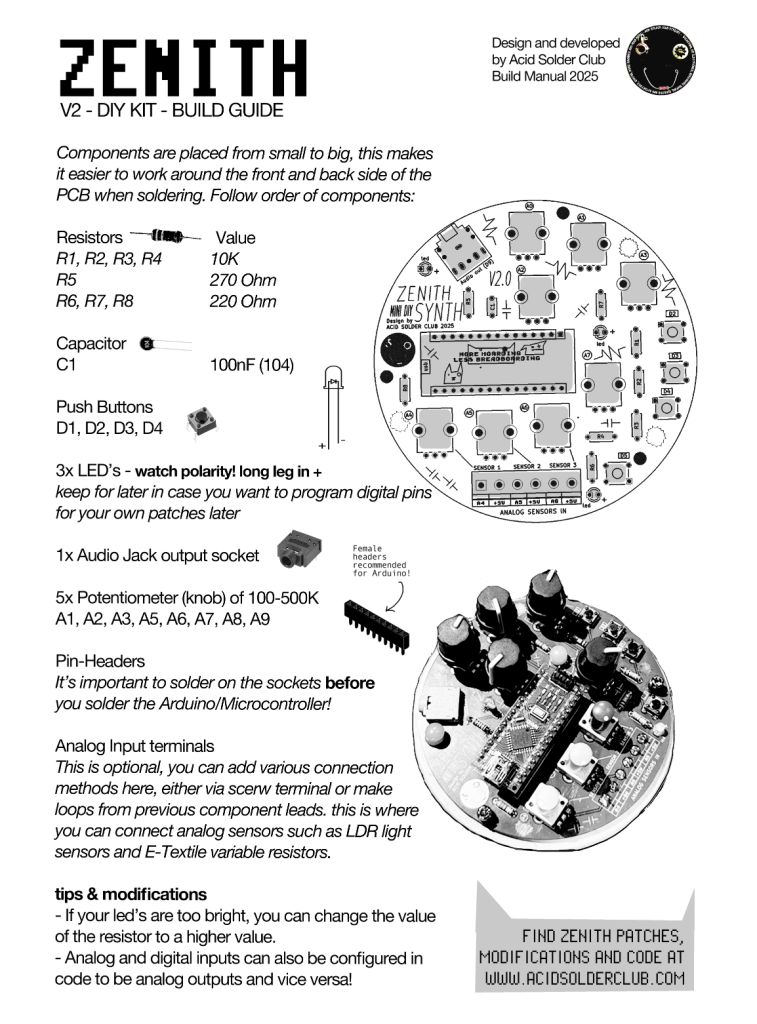
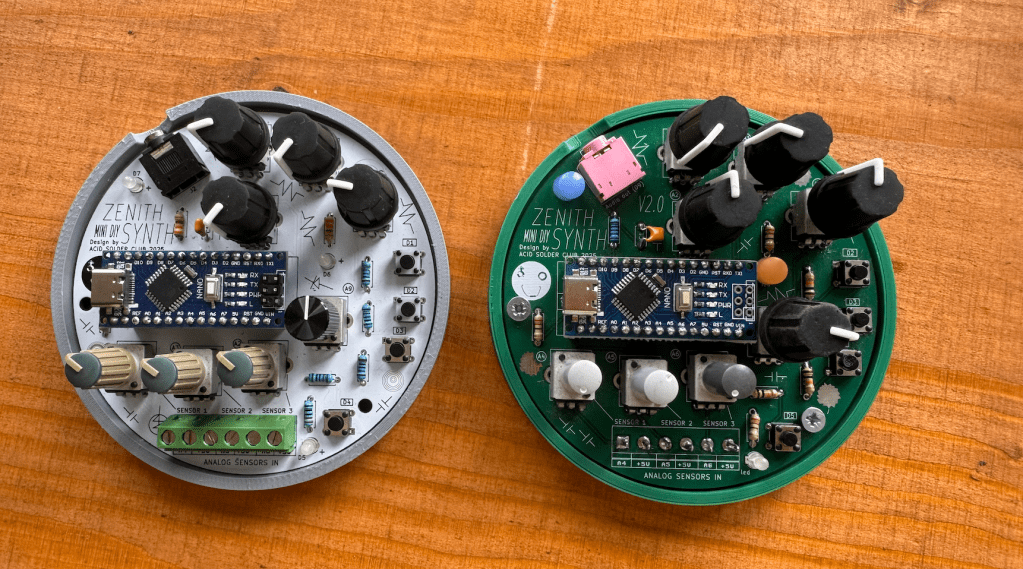
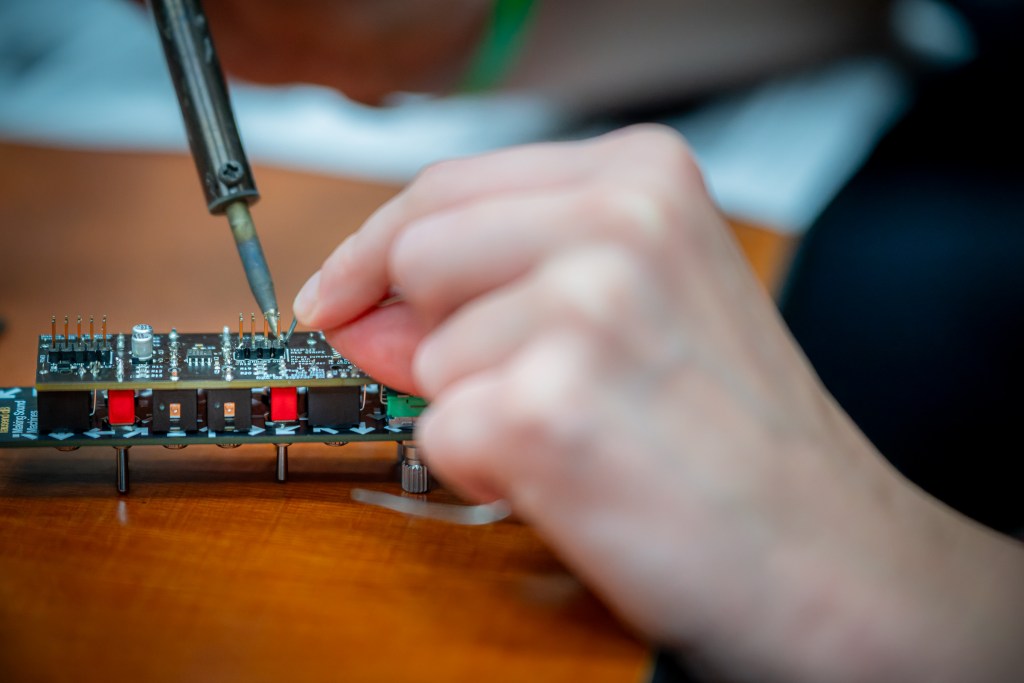
Acid Solder Club’s ZENITH is a standalone diy synthesiser that eliminates the drag and hassle of breadboarding for beginners, who are eager and hyped to solder, design and code their first synth!
Zenith
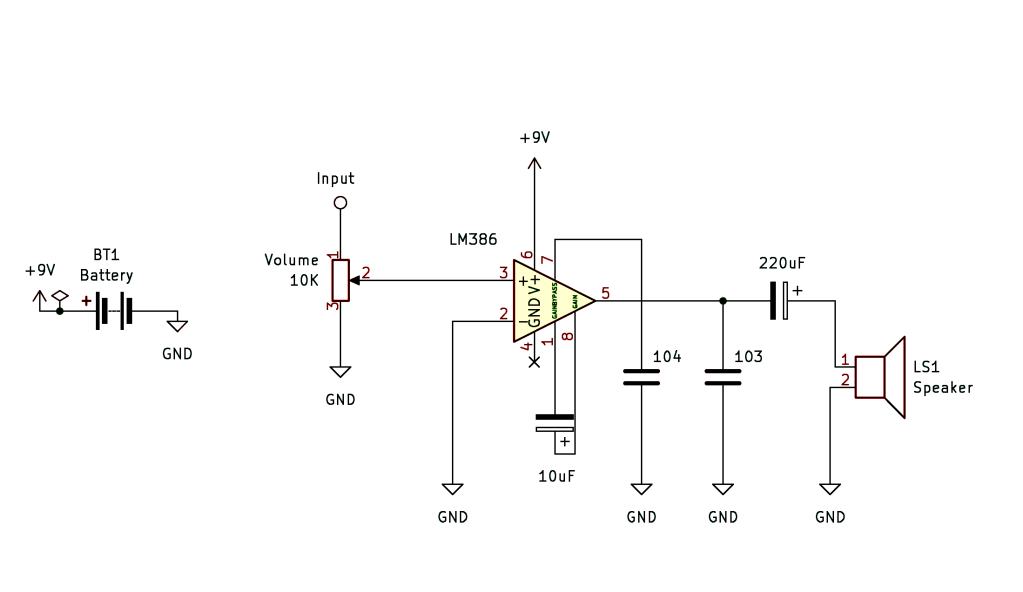
This portable disk of sonic mayhem comes with an Arduino Nano brain and various components, that easy the way of programming Arduino projects for beginners. ZENITH can be programmed as a sound source, modulation source or controller for led’s and other hardware and comes with audio output jack onboard.
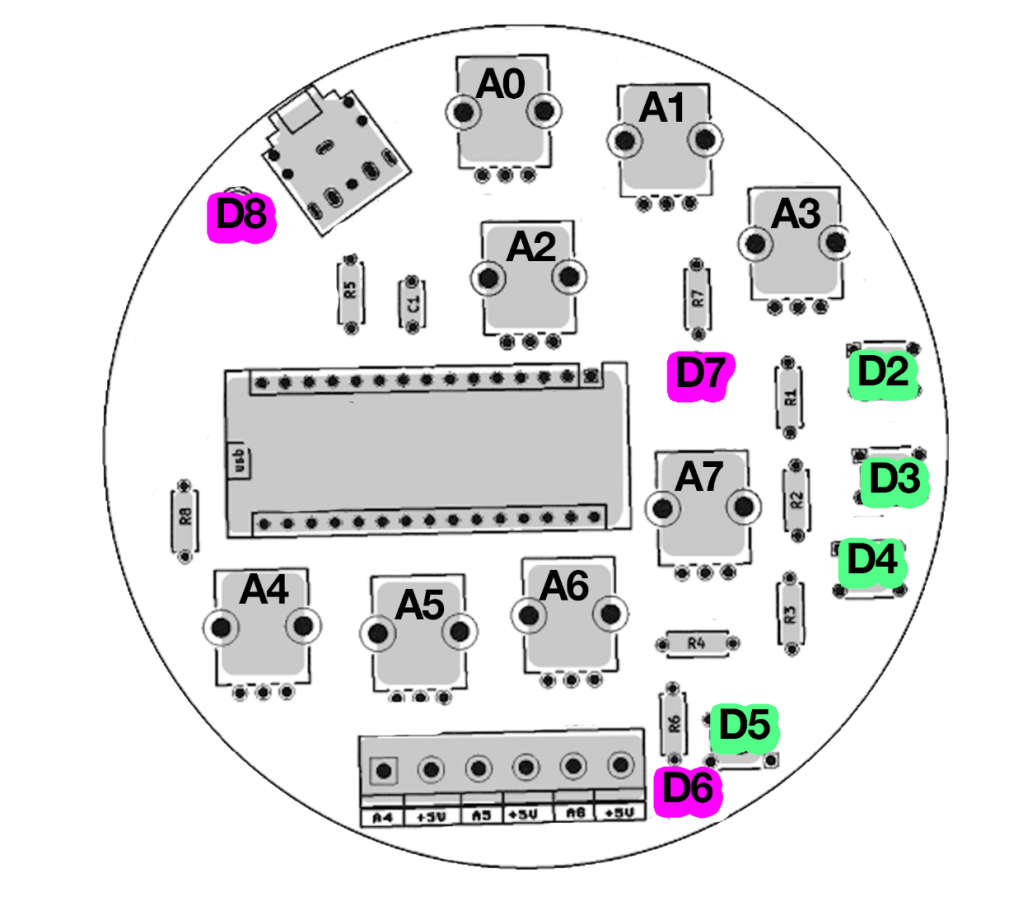
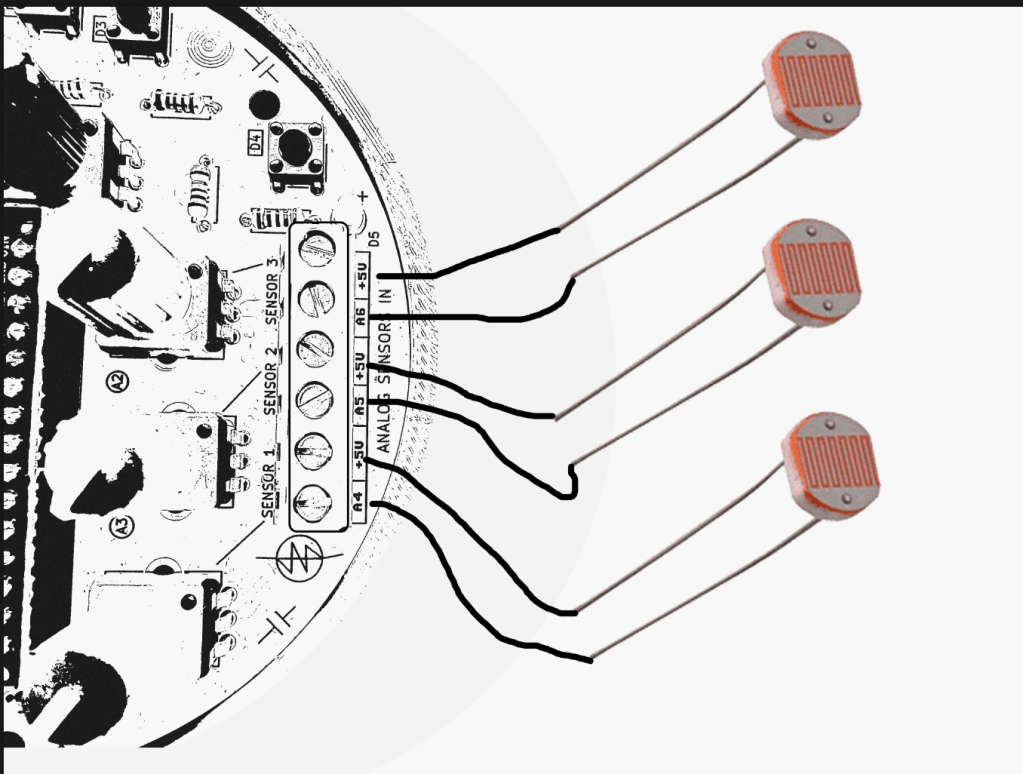
You can program a FM Bass Syntheseizer, Random Arpeggiator or noise source and much more! Zenith contains a set of 5 control potentiometers, and 3 analog input ports that are routed to be used as a voltage divider so you can tweak and adjust the amount of incoming analog sensor data (which is very handy for light sensors/LDR’s). There’s also 4 digital I/O points with switches, and 3 led’s in the basic kit.
The onboard Digital pin connectors can also be used to trigger relays, turn DC motors on and off, control pixel LED’s and it’s kind of skipping all the important electronic breadboarding experience you would be having learning electronics the traditional ways so you can learn and use code with Arduino Nano, without having to drag along a breadboard all the time.
After soldering and following the build guide! Your kit should look like somewhat like this! Use the USB-C power connector of the Arduino Nano to power Zenith.
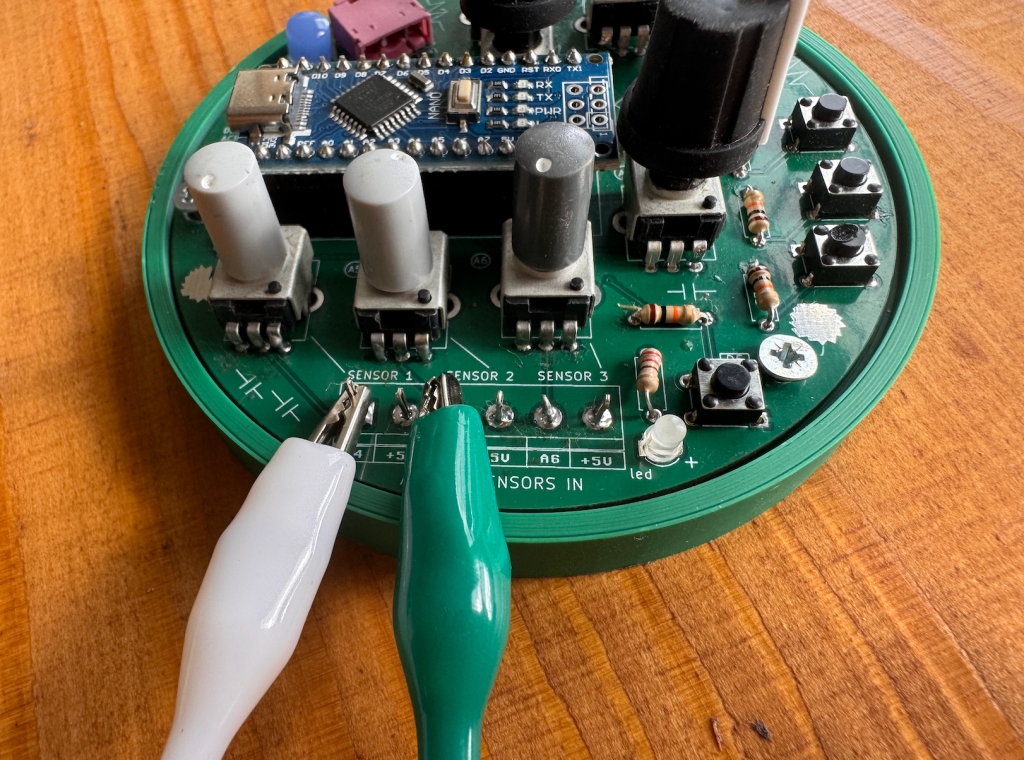
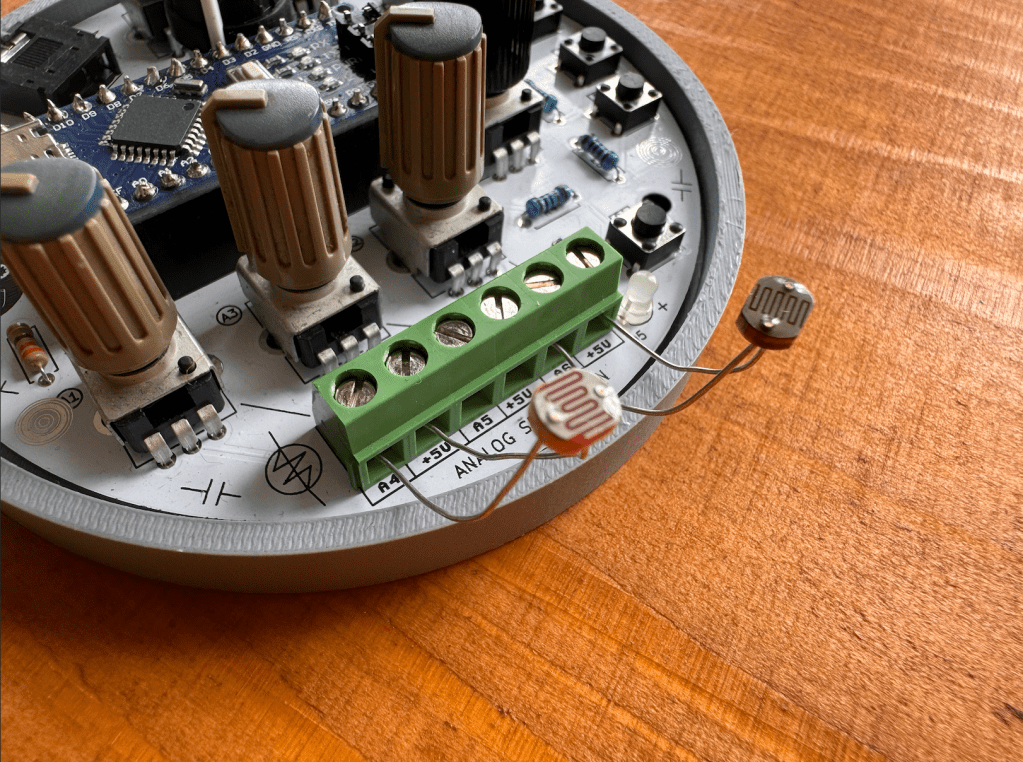
Connectivity Terminals
from the kit, because some people wanted to leave these points open to solder something on later. You can also bend some of your leftover clipped components leads to create pins for connecting alligator clips to! Here you see 2 different ways of connectivity:
Analog Sensors
Zenith is designed to work well with external use of Analog Sensors, if you’re new to this concept of analog sensing, there’s some nice documentation about this on the Adafruit Analog Input page. The analog sensor input, can pick up changing voltages in sensors such as:
E-Textiles: variable resistors, find a repository of different examples of E-textiles here at Kobakant.
Combinations of conductive and non-conductive materials: such as copper, metals, conductive paint, conductive print filament, charcoal.
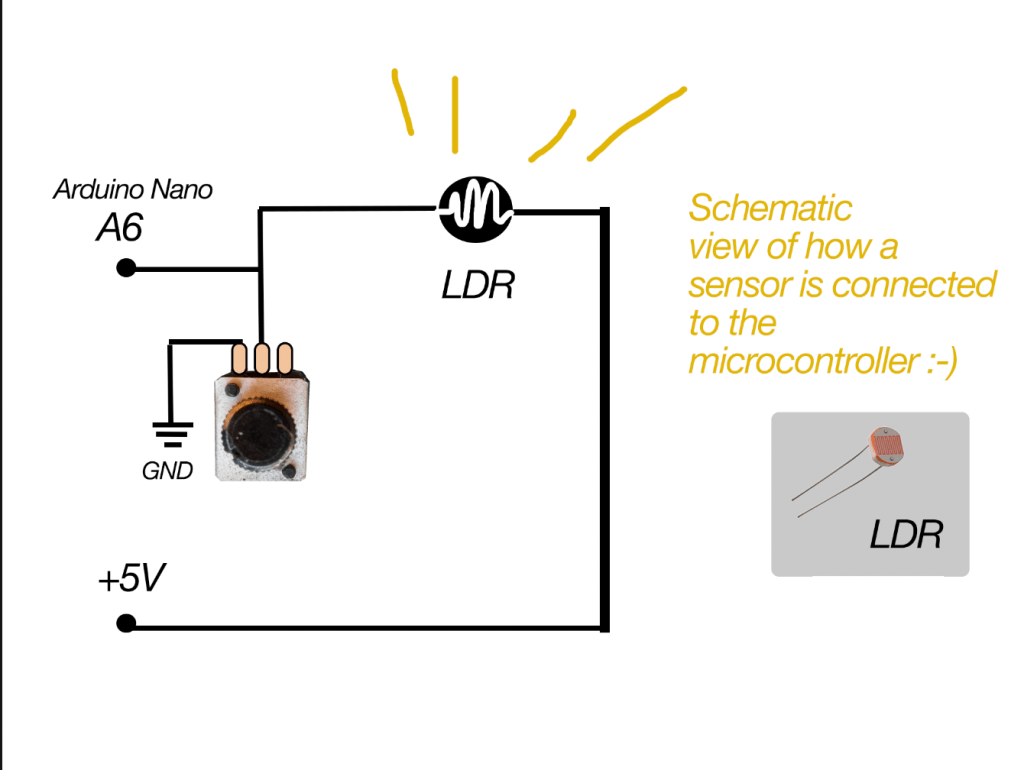
in the schematic representation of Zenith (below) you can see that each sensor input will go trough a potentiometer before connecting to the microcontroller. In this way, the potentiometer acts as a Voltage Divider. Simple explanation: it makes the sensor input variable and adjustable (more or less electricity flow) before it is read by the Arduino. Which is handy if you want to have more or less sensitivity on your sensor.
Always make sure your sensor is connected to the +5V on one side, and the Analog sensor pin on the other side:
Arduino Nano ADDITIONAL DRIVERS?
This is something that was noticed on a recent DIY kit day where people soldered a Zenith, not all Arduino Nano’s are the same! Some are connectible via USB-C, and they have a different chip on board which means you need to install some additional drivers at home if you want to code with your Arduino Nano.
Some of the Arduino Nano’s are from Hobby Electronica -> here <- and are Arduino Nano’s with USB CH340 onboard, they are compatible with the Arduino IDE and programming environment just like a normal Nano after installing the driver.
These Arduino Boards have an integrated CH340 usb onboard, and this means you have to install some additional Drivers. A driver is an extra piece of software, that allows your computer to “see” the Arduino Nano over usb-c, and accept it as a valid USB microcontroller to program on. Theres detailed instructions on the Hobby Electronica website, you can also find the needed
Download the one you need and your PC has to restart afterwards. Now you should be able to upload on the board without any problems, otherwise send out a message!
In case you have Arduino Nano without the CH340 usb connection, this step is not needed! You will notice if you try to upload the codes if you need drivers, the Arduino IDE will give you an error that is something like: “usb driver not found” or Board not found.
There’s multiple roads to learning how to program with an Arduino, some like to first change numbers around in example codes, others like to follow step by step tutorials breaking down each part of code and hardware after another.
For programming the board one way or the other, you always need some sort of progreamming environment and the most common for Arduino is the ARDUINO IDE. You can also code via the webbrowser and other software but thats for another time.
You can start from scratch and map different parameters of Zenith (potmeters, sensors, switches) to led’s and sound outputs. One of the libraries I’ve used for sound programming is the Mozzi Library. There’s a step by step instruction there and the sound output of ZENITH is PIN 9 for if you want to try out example codes there!
Layout for what is doing what exactly of the code coming soon! so far controls are:
use A0, A1, A2 for controlling the Basssline FM parameters such as carrier wave and modulating wave.
A3 Controls DISTORTION (yay)
A7 control output volume
pushbutton D2 = tap tempo! tap this in different speeds to change the overall tempo.
D3 = short burst of speed change
D4 = pitch octave up!
potentiometers on the bottom A4,A5,A6 are controlling speeds as well and can be modulated by light sensors or be even fancier with this and smack some vactrols on there to be controller by external LFO’s!
Code 2: Pulsating Led’s! More Chaos! even less playability of understanding what is doing what! this is for the noise ones! oh where this ends I dunno… can you wreck it more?
controls are mostly on A0, A1, A2, A3 and A7 for mangling the Amen Break sample such as sample speed, modulating speed, more more more things to glitch and stretch the sample apart till not a lot is left 🙂
BArtpeggio
Code for Zenith made by hardware hacker and super coder Bart Jakobs: a generative Arpeggio for Zenith! Thank to Bart for this amazing patch. Tweak around the main knobs to get interesting involving patterns, trow it through some effects pedals and let this patch tickle your ear buds!
use A0, A1, A2, A3 for controlling the arp parameters.
A7 is controlling the ARP speed
pushbuttons change arp variations and scale!
click noises included ❤
FAQ
Can I add more things to Zenith?
yes, all other unused inputs are possible to use if you have a method to work around the interface. Let your inner hardware hacker go wild
Is Zenith open source?
So far the schematic and code are open source, the kit/pcb is planned to be open source but not yet as for 2025.
Can I follow a class at Acid Solder Club for programming?
YES! this is planned for upcoming months after summer, you can bring your soldered ZENITH or build one on site and there will be multiple basic coding classes for both schools and from the workspace in Utrecht!
Share your own code too! if you have coded something on zenith you want to share let me know via email and I can add it to the patch community folder on the website!
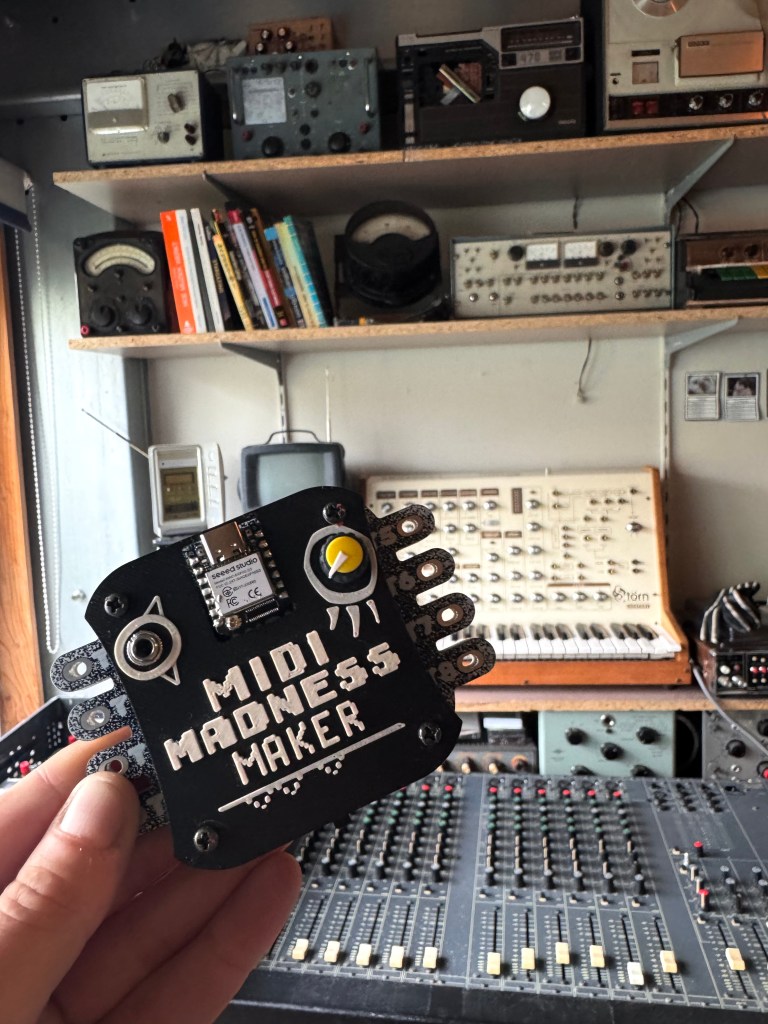
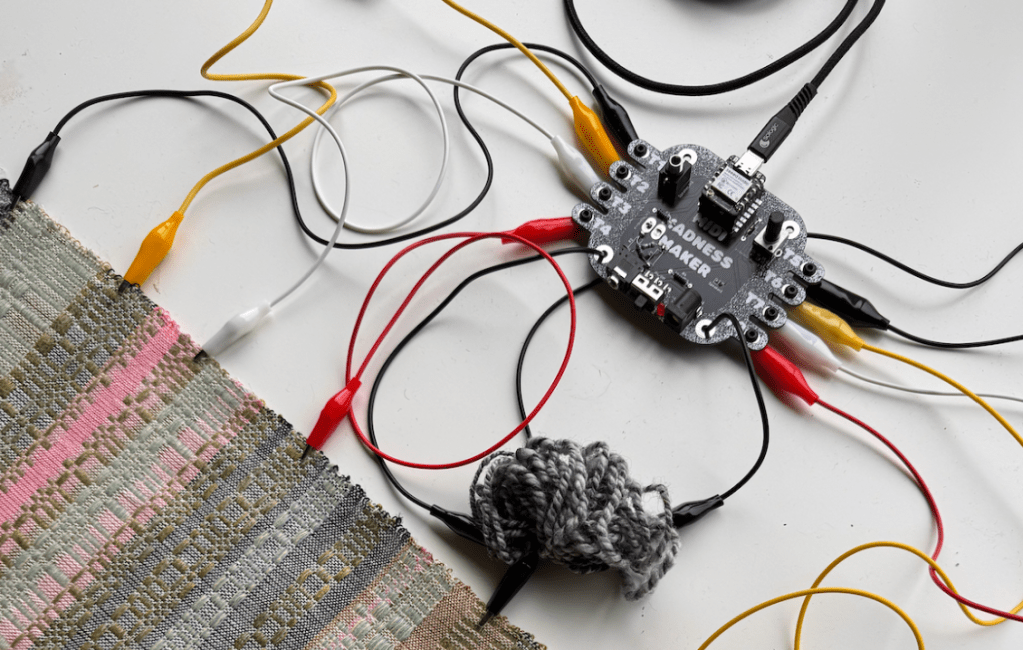
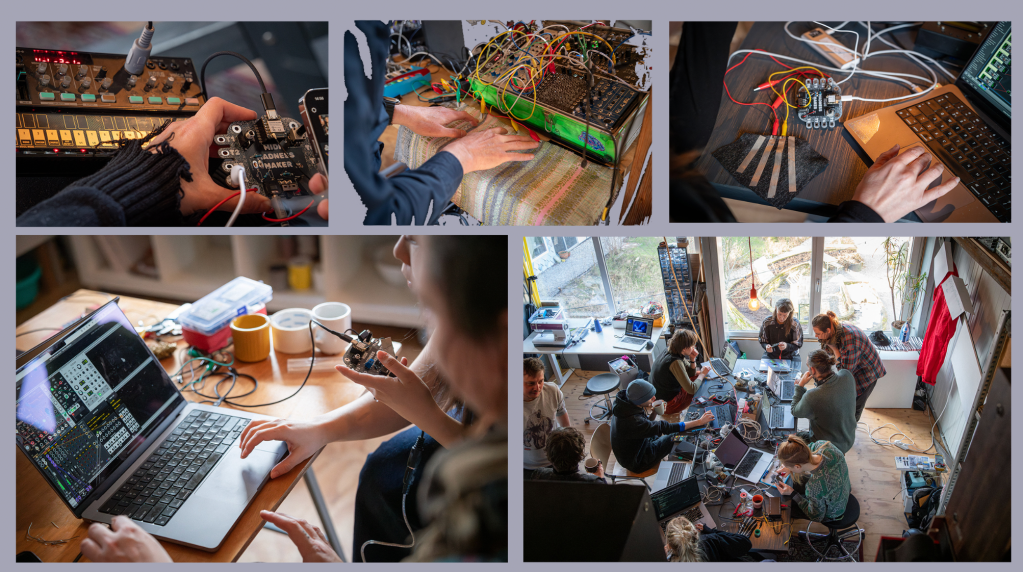
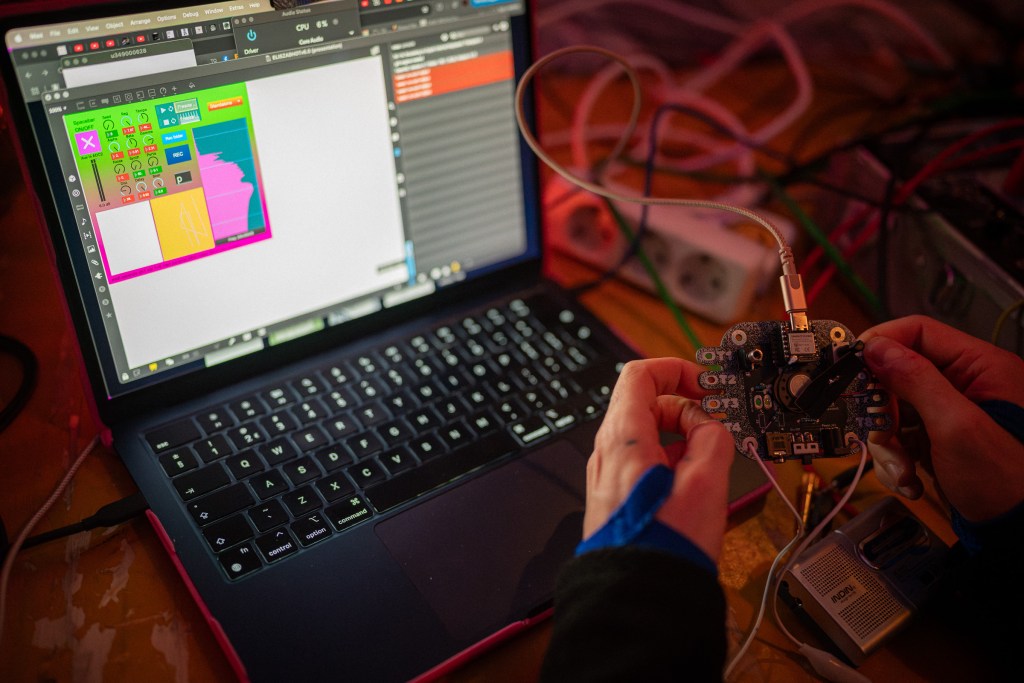
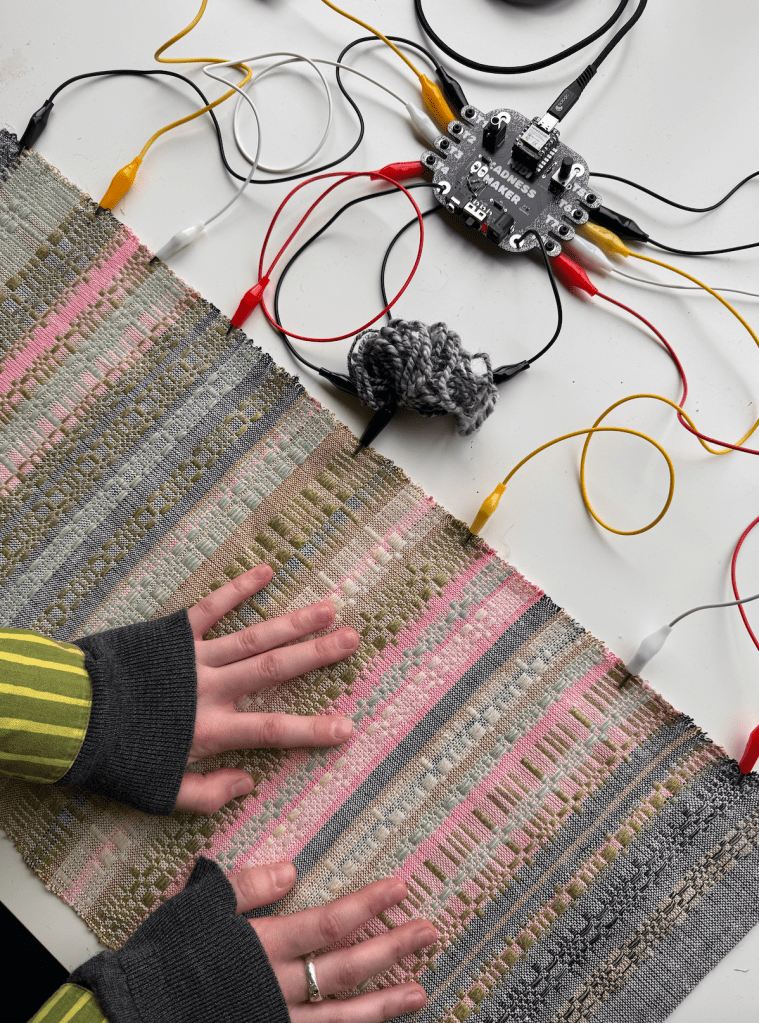
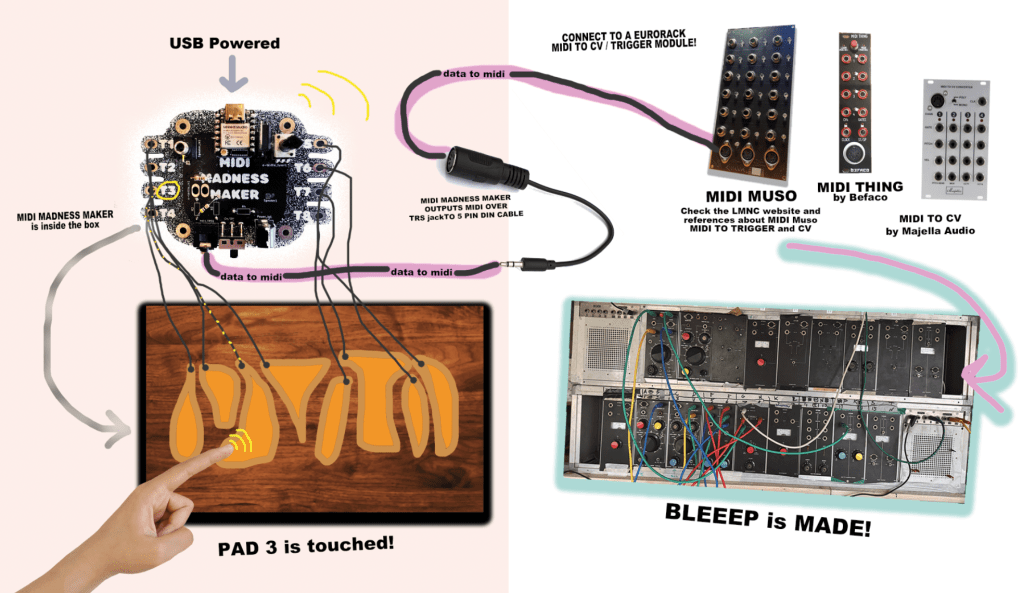
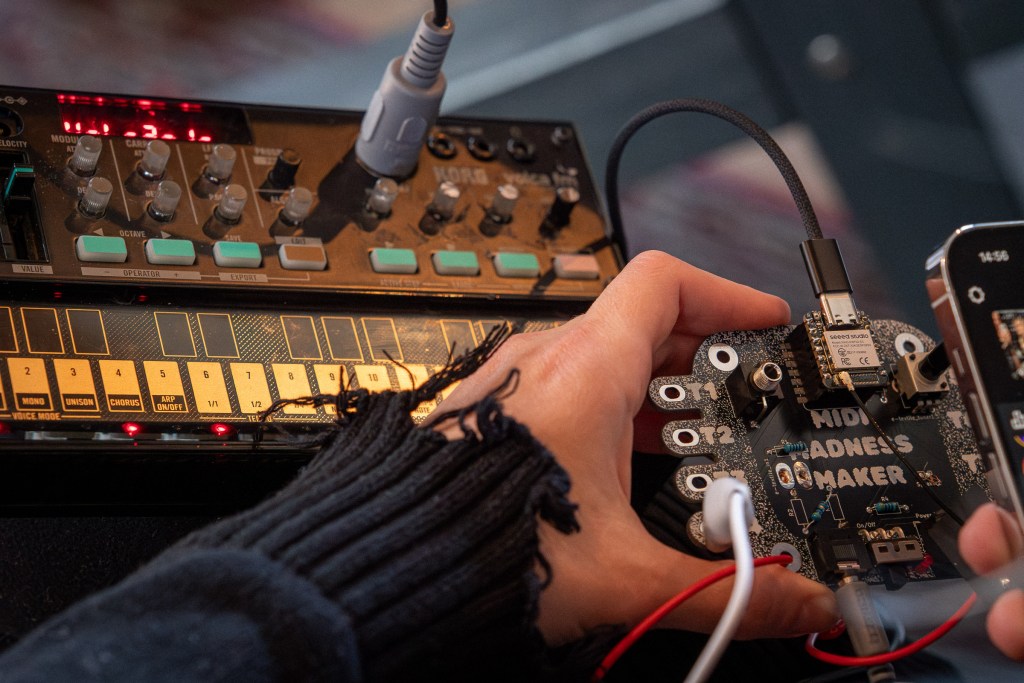
The MIDI MADNESS MAKER, is a standalone DIY syntheseizer and MIDI controller interface you can make yourself with a focus on capacitive touch data. With Midi Madness Maker you can create your own tactile controller translating touch to MIDI control and CC messages over TRS-Midi jack- 5 pin DIN or Wireless over Bluetooth.
We have made a giant online repository of example codes available for those who want to try things out with the MIDI Madness Maker. In February 2025 we launched the first hackathon where various artist, makers and designers in the field of creative technology, music and interaction build their own kits and interfaces. We are planning more Hackathons and one day workshops in 2025 and 2026, and are working on the V2.0 version that will be in production around august 2025.
E-Textile Keyboard crafted by Michelle Vossen
BUILD DOCS AND MANUALS
Here you find your page for all the info we’re collecting from Midi Madness workshops and hackathons. Build guides, patch guides and code updates:
What is the midi madness maker made of? The brain runs of a XIAO ESP32 microcontroller and consists of mostly that and a few more other components and utilities, to help out with MIDI-TRS translation and power regulation for external power sources. The Kit is a fairly easy build that can be finished and tested in 1-2 hours (on beginner lvl).
The kit contains a few optional parts, such as the build-on speaker depending if you want that option or output the sound over the Audio Output Jack. Another optional part is the Bluetooth antenna, so far we have had no connectivity issues without it, but for more stable data transfer and farther reach, the antenna is recommended to click on the microcontroller (included in kit)
MIDI MADNESS MAKER EXAMPLES
Modular Synthesiser Touch Controller
Make your own DIY TOUCH controller for modular synthesisers and hardware synths over MIDI trs -DIN connection. For this option you will need some sort of midi to Gate/CV translation module, such as the Befaco Midi Thing V2 (DIY KIT), Majella MCVC or the DIY Project “MIDI MUSO” MIDI to CV soldering kit https://midimuso.co.uk.
Code is fairly simple: you can find the layout of the touch pads of the ESP32 in the Midi Madness Maker repository, or figure them out by searching for the pinout of the microcontroller. Connect your own conductive touch interface to the midi madness maker, and in the code you make use of the Arduino MIDI Library where every time touch happens, it will send a MIDI Trigger or CC blip out over the TRS-mini jack to 5-Pin Din converter. IMPORTANT! There is 2 types of midi in this world, TYPE A ( Korg, MakeNoise) and other TYPE B (Arturia, Polyend) You can find the MIDI type A or B guide here: https://minimidi.world/?
Other Hardware Synthesisers and Drummachines
The sample principle as above (connection wise) is used for controlling hardware synths such as the Roland TR-505, KORG Volca Series, or a pretty Access Virus of your liking. In this case, you will not need a Eurorack Module to translate the MIDI 5 PIN DIN cable to triggers and gates or CV, since this conversion is happening in the hardware devices.
Midi Madness Maker controlling KORG Volca FM
SOFTWARE MIDI CONTROLLER
With the MMM you can also control MIDI related Software connecting and connect your touch board to various DAW’s such as Ableton, Garageband, FLStudio, VCV rack and iPad/tablet apps, that can receive MIDI data.
This can both be used:
by MIDI over USB (usb port of the ESP32)
by MIDI wireless over Bluetooth (Midi Madness Maker is then recognised as a Bluetooth device by your PC or Phone)
This means the MIDI MADNESS MAKER can be used to:
Control Audio Software (Ableton, VCVRack, Mirack, Reaper etc.)
Control Video Software (TouchDesigner, Isadora, Madmapper, Resolume etc.)
Control Light Software (Resolume, QLC+, other DMX software)
other devices that have midi control options and can see Bluetooth or USB MIDI Devices.
midi madness maker to VCV rack during MMM Hackathon February 2025
MORE INFO
ah so much information to share about this we will put examples out soon on Acid Solder Club YOUTUBEpage and other platforms about user cases and all kinds of cool things to do with the Midi Madness Maker!
Get in touch with us also if you are interested in hosting us for a workshop touch to sound, hackathon or any other event!
Kit design and concept is by Veerle Pennock and Michelle Vossen.
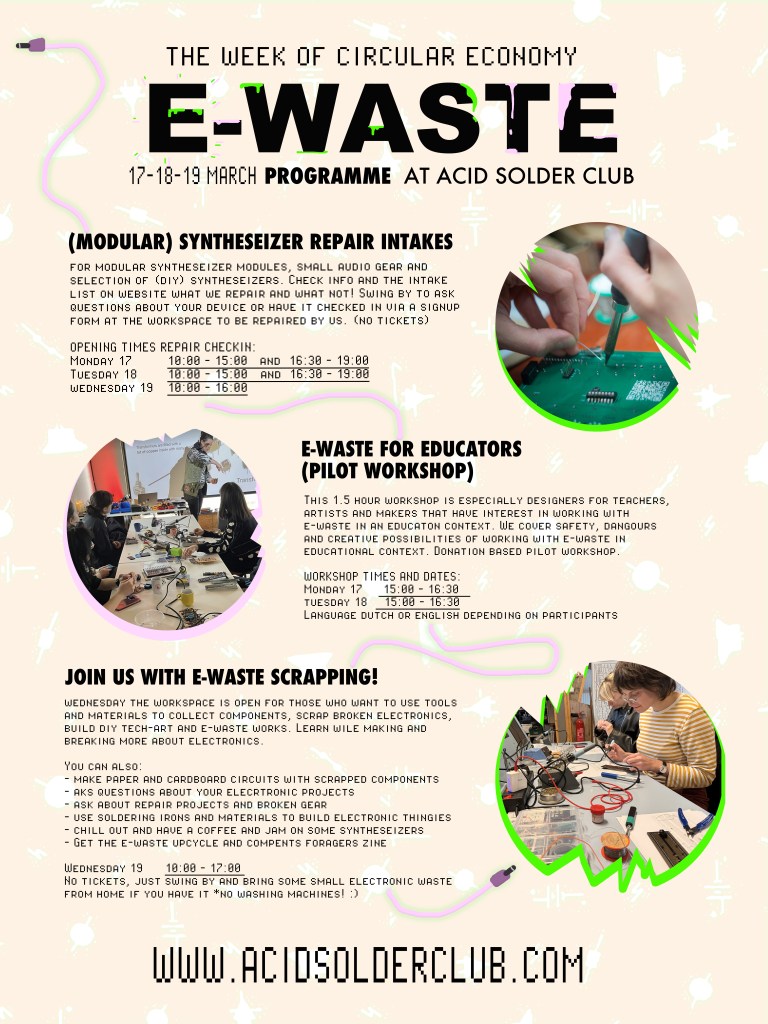
Op woensdag 19 maart is de werkplaats open voor iedereen die gereedschap en materialen wil gebruiken om componenten te verzamelen, kapotte elektronica te slopen, DIY tech-art te bouwen en e-waste projecten te maken. Leer meer over elektronica terwijl je dingen maakt en uit elkaar haalt.
Je kunt ook:
Papieren en kartonnen circuits maken met gerecyclede componenten! (paper circuit soldering)
Vragen stellen over je elektronische DIY projecten
Advies krijgen over reparaties en kapotte apparatuur
Soldeerbouten en materialen gebruiken om elektronische circuits en DIY kits te bouwen
Chillen, koffie drinken en jammen op modulaire synthesizers
langskomen voor een E-waste Upcycle en elektronische componenten magazine.
Data
Woensdag 19 maart
10:00 – 17:00
Geen tickets nodig, dit is een gratis event. Breng wat klein elektronisch afval /E-waste mee van thuis wat je uit elkaar wilt halen en onderzoeken als je dat hebt (maar geen wasmachines en grote apparaten! 😉)
English
On Wednesday the 19th of March, the workspace is open for those who want to use tools and materials to collect components, scrap broken electronics, build diy tech-art and e-waste works.
Learn wile making and breaking more about electronics. You can also:
make paper and cardboard circuits with scrapped components!
aks questions about your elecrtronic projects
ask about repair projects and broken gear
use soldering irons and materials to build electronic thingies
chill out and have a coffee and jam on some syntheseizers
Get the e-waste upcycle and compents foraging zine
No tickets! Swing by the workspace during opening hours, free event with no cables attached. You can bring small electronics and e-waste with you, no huge washing machines and such 😉
Tijdens de Week van de Circulaire Economie biedt Acid Solder Club een reparatieservice voor modulaire synthesizers, kleine synths en audio-apparatuur. Bezoekers kunnen hun synth gear laten beoordelen door experts, die inschatten of reparatie mogelijk is en wat de kosten zijn. We behandelen vooral de meest voorkomende gebreken en reparaties en bij complexe problemen verwijzen wij je door naar andere reparateurs in Nederland.
Intake vereisten
Wat kan je wel langs brengen:
Eurorack Synthesizer modules (zowel DIY als niet diy)!
Open source Eurorack Modules met de juiste documentatie en referenties naar build docs.
Standalone synthesisers en drumcomputers van desktop formaat van merken waar handleidingen van te vinden zijn + waarbij reparatie beperkt is tot faders, audio jacks en/of potentiometers.
Vintage Synthesizers met duidelijke mankementen aan kabels, audio jacks en/of potentiometers wanneer er goede documentatie van is.
Gitaar Pedalen wanneer het gaat om een diy project, geen high end super duper digitale insane pedalen die mega duur zijn en het niet gaat om hardware mankementen.
Wat kan je niet langstrengen:
Grote mixers en mengtafels…
Audio interfaces en high end digitale interfaces waarbij het meer is dan faders, potentiometers of audio jacks repair.
Overige audio gear, DJ gear, draaitafels, band recorders, gitaarversterkers, buizen apparatuur, speakers en PA systemen, cassette decks, licht apparatuur, laptops, telefoons, huishoudelijke apparaten (schrijf je hiervoor in voor een repair workshop 😉
image Paulus – Paulscheffer.com
Reparatie Procedure
Heb je modules of apparaten die vallen binnen de intake vereisten hierboven of twijfel je?!
Neem ze mee tijdens de openingstijden van de werkplaats tijdens deze momenten:
Maandag 17 Maart
10:00 – 15:00 en 16:30 – 19:00
Dinsdag 18 Maart
10:00 – 15:00 en 16:30 – 19:00
Woensdag 19 Maart
10:00 – 16:00
Neem contact met ons op!
Je kunt ook van tevoren een e-mail sturen naar acidsolderclub@gmail.com met daarin welk apparaat je mee wilt brengen, naam, grootte en wat gerepareerd moet worden of wat er mis is gegaan, indien je dat weet tuurlijk.
Bij aankomst stellen we samen vast of we het kunnen repareren en wat de kosten hiervoor zijn. Je krijgt een formulier bij ons en we hanteren per intake basis onderzoekkosten van €30. (dus niet bij aankomst, maar na officiële intake, gesprek is vrijblijvend) en verwachten tot zover reparaties uit te kunnen voeren binnen 1 maand max.na intake.
Mocht je apparaat bij intake niet passen binnen onze lijst dan kunnen we je doorverwijzen naar een van de reparateurs uit het netwerk
ENGLISH
Acid Solder Club – Repair Service during the Week of Circular Economy
During the Week of Circular Economy, Acid Solder Club offers a repair service for modular synthesizers, small synths, and audio equipment. Visitors can have their gear assessed by experts, who will determine whether a repair is possible and estimate the cost. We primarily focus on common issues and repairs, and for more complex problems, we can refer you to other repair specialists in the Netherlands.
Intake Requirements
What you can bring:
Eurorack Synthesizer Modules (both DIY and non-DIY)
Open-source Eurorack Modules with proper documentation and references to needed build docs.
Standalone Synthesizers and Drummachines (desktop-sized) with available manuals, where repairs are limited to faders, audio jacks, and/or potentiometers.
Vintage synthesizers with clear issues related to cables, audio jacks, and/or potentiometers, provided good documentation is available
Guitar pedals (DIY projects only or basic pedals) No high-end, ultra-digital, super shiny expensive pedals unless the issue is hardware-related. (jacks, cables, pots)
What you cannot bring:
Large mixers and mixing consoles
Audio interfaces and high-end digital interfaces with issues beyond faders, potentiometers, or audio jacks
Other audio gear, DJ equipment, turntables, tape recorders, guitar amps, tube gear, speakers & PA systems, cassette decks, lighting equipment, laptops, phones, or household appliances (sign up for a repair workshop for these!)
Repair Procedure
Do you have modules or devices that fit within the intake requirements above, or are you unsure? Bring them by during our workshop opening hours on these dates:
Monday March 17
10:00 – 15:00 and between 16:30 – 19:00
Tuesday March 18
10:00 – 15:00 and between 16:30 – 19:00
Wednesday March 19
10:00 – 16:00
Contact us!
You can also send an email in advance to acidsolderclub@gmail.com, including details about the device you want to bring, its name, size, and what needs repair (or what went wrong, if you know).
Upon arrival, we will determine together whether we can repair it and what the cost will be. You’ll receive a form from us to sign up. We charge a €30 intake diagnostic fee after completion of intake (not before).
Repairs are expected to be completed within a maximum of one month after intake (no later than the end of May).
If your device does not fit within our list upon intake, we can refer you to one of the repair specialists in our network.
Deze workshop van 1,5 uur is speciaal ontworpen door Acid Solder Club voor docenten, kunstenaars, ondernemers en makers die geïnteresseerd zijn in het werken met e-waste binnen een educatieve context en hier meer over willen leren.
In deze korte hands-on workshop leer je hoe je veilig kunt werken met e-waste en het kunt gebruiken om creativiteit en hergebruik in het onderwijs te stimuleren.
Na aanleiding van praktijk voorbeelden en een E-waste upcycle handleiding gaan het hebben over:
E-waste begrijpen: wat is veilig en onveilig
Gereedschap, materialen en technieken
Stappenplan voor demontage van E-waste
Hoe ontwerp je een efficiënte en duurzame workshop?
Wat gebeurt er na de workshop? what to do with the waste of waste?
Hoe kan je innovatie en creativiteit stimuleren bij een jongere doelgroep?
Dit is een pilot workshop die vaker gegeven gaat worden in de komende maanden gegeven door Veerle. De inschrijving is op bijdrage van donatie. (suggestie €15-€25 afhankelijk van je budget)
Inschrijven
Je kunt je inschrijven door een mail te sturen naar acidsolderclub@gmail.com met daarin je naam + achternaam, grootte van je gezelschap en contactgegevens. Het is een kleine werkplaats, dus er is maar plek voor max 6 deelnemers per sessie voor de pilot workshop.
Data en tijden:
Maandag 17 Maart van 15:00 – 16:30
Dinsdag 18 Maart van 15:00 – 16:30
De voertaal zal Nederlands of Engels zijn afhankelijk van inschrijvingen.
E-waste for Educators
This 1.5-hour workshop is specifically designed for teachers, artists, entrepreneurs, and makers who are interested in working with e-waste in an educational context.
In this workshop, you will learn how to safely work with e-waste and use it to integrate this material creatively within education and promote up-cycling electronic waste with a younger audience.
Trough practice examples and use of a handmade E-waste magazine, we will cover the following topics:
Understanding E-waste: What is safe and unsafe?
Tools, materials, and techniques
Step-by-step guide to dismantling E-waste
How to design an efficient and sustainable workshop format.
What happens after the workshop? What to do with the waste of waste?
How to encourage innovation and creativity in younger audiences?
This is a pilot workshop designed by Veerle, that has the aim to be held more frequently in the upcoming months. Therefore for this edition, participation is based on donations. (Suggested contribution: €15-€25, depending on your budget.)
Sign up
You can register by sending an e-mail to acidsolderclub@gmail.com with your full name, group size, and contact details. The workshop takes place in a small workspace, so there is a maximum of 6 participants per session for the pilot workshop.
Dates & Times:
Monday, March 17, 15:00 – 16:30
Tuesday, March 18, 15:00 – 16:30
The workshop will be conducted in either Dutch or English, depending on the participants.


