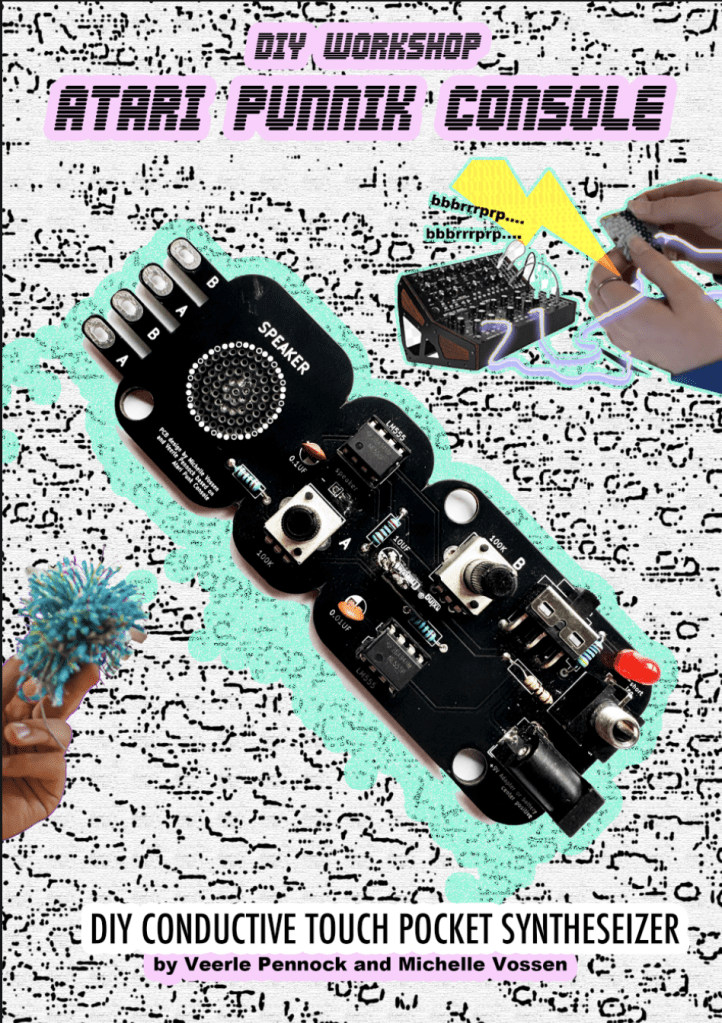
The Atari Punnik Console is based on the famous and well known “Atari Punk Console” diy beginner synthesiser circuit, and works the exact same way, accept it is modded and re-designed to work with touch and conductive materials such as E-textiles, conductive yarn, nails, screws, copper, random dead electronics and body contacts.
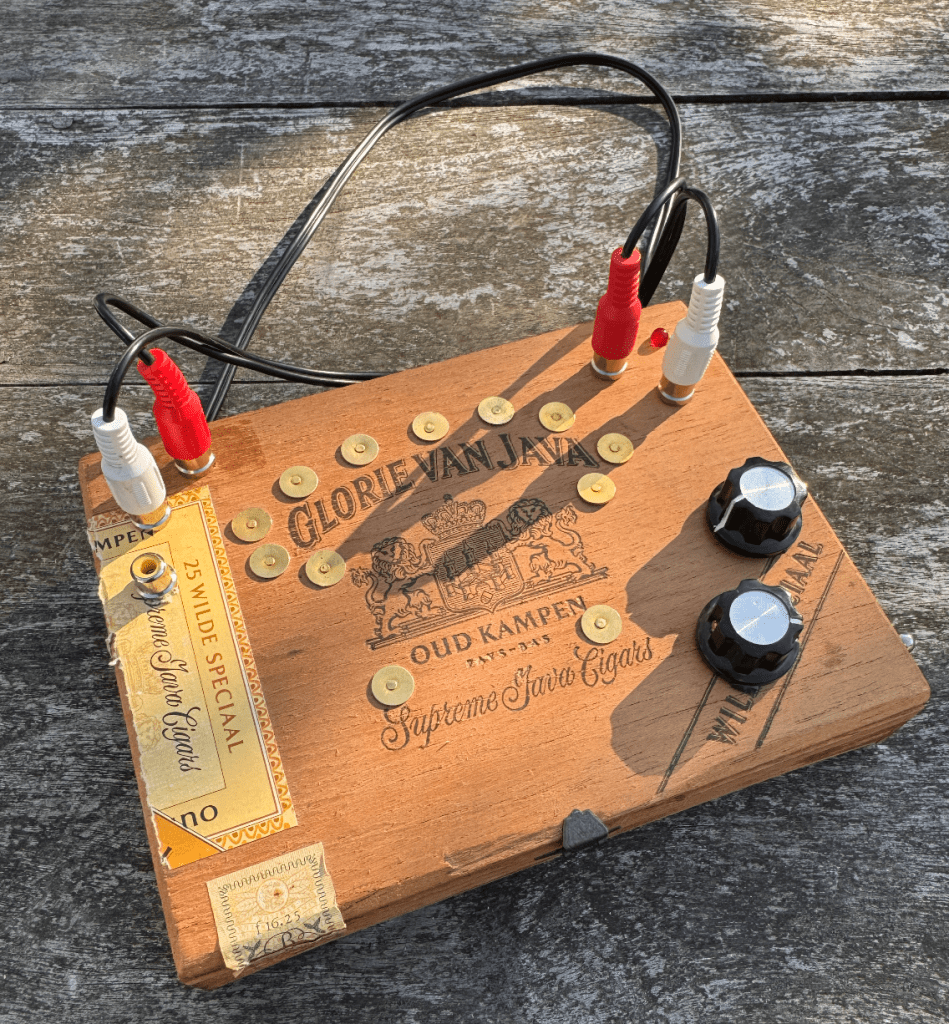
Atari Punnik Console inside cigar case enclosure
The Atari Punnik Console is inspired by a knitting tool called a “Punnik Poppetje” in Dutch, which is a wooden tool used for making certain knits. This kit is the perfect sonic pocket annoyance for kids and adults looking into getting more soldering experience, for seasoned noisemakers who want to involve touch sensing into their live sets, or synth parents wanting to get their kids involved into synth DIY and soldering.
The kit is developed in 2025 by Veerle Pennock and Michelle Vossen in 2024.
Conductive Paint (such as Bare Conductive paint or make your own)
Conductive Charcoal and/or Pencils
Electronic components such as Potentiometers, Faders, Rheostats, Force Sensitive Sensors, Thermistors (temperature sensing), Bendable Flex Sensors.
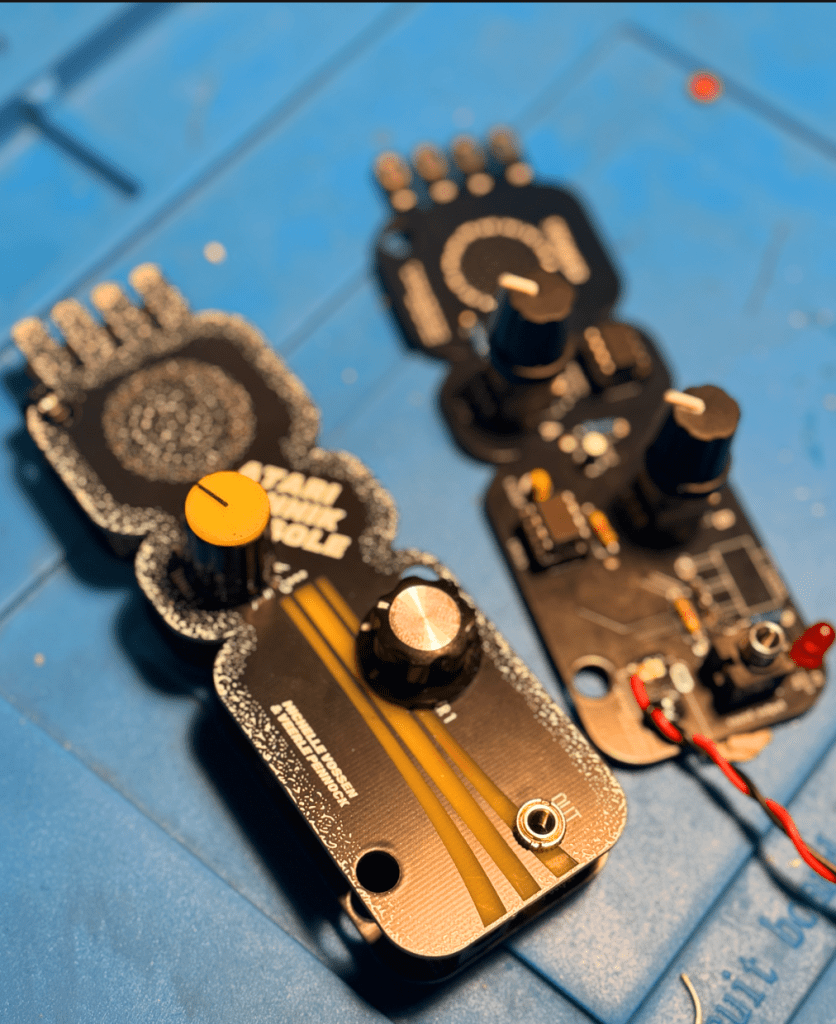
You can connect these sensors in series with each other, so one after the other. As long as you keep the signal flow from A->A separate from B->B. or in Version 2. of the APC keep the CAT icons and STAR icons together. (more on this in the build doc)
Build Documents
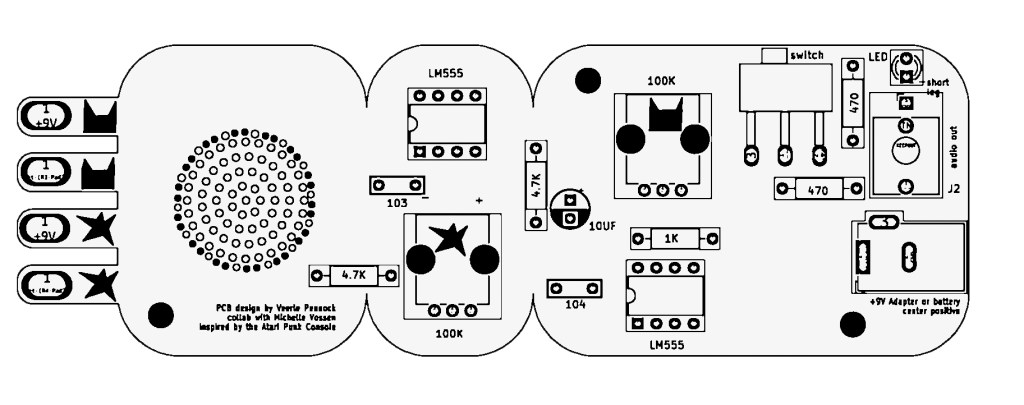
here you find the build doc for soldering the Atari Punnik Console V1.0.
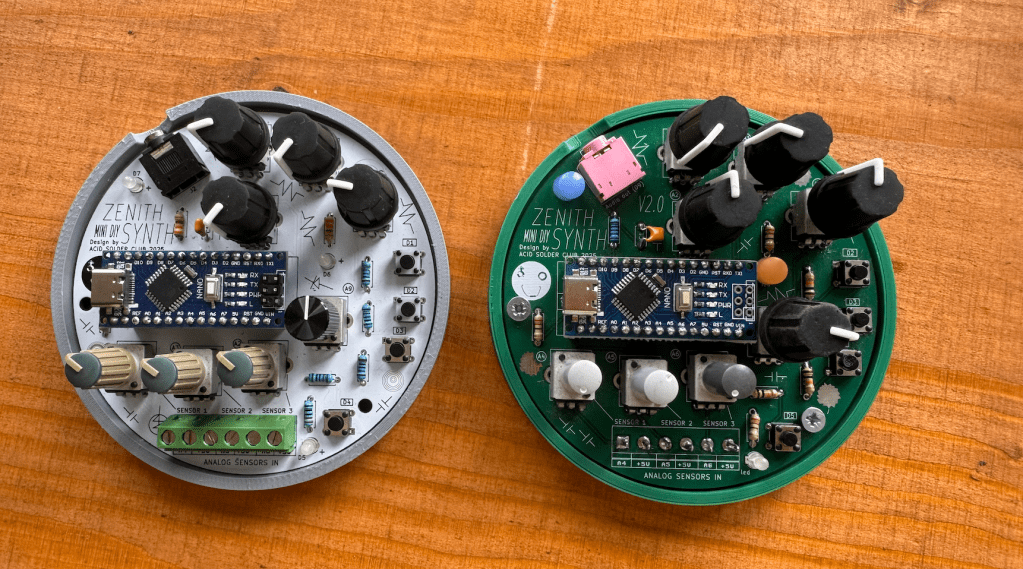
here you find the layout for the Atari Punnik Console V2. You can follow the same build guide as V1.0, the biggest change is we changed the sensor connections A and B to illustrations of cats and stars to make it easier to know what needs to be connected with what.
Test your unit and connect a bunch of random conductive materials in-between the signal paths! As long as the CATS are connected to the CATS and the STARS to STARS in the end ..you can add as much conductive shizzle in between!
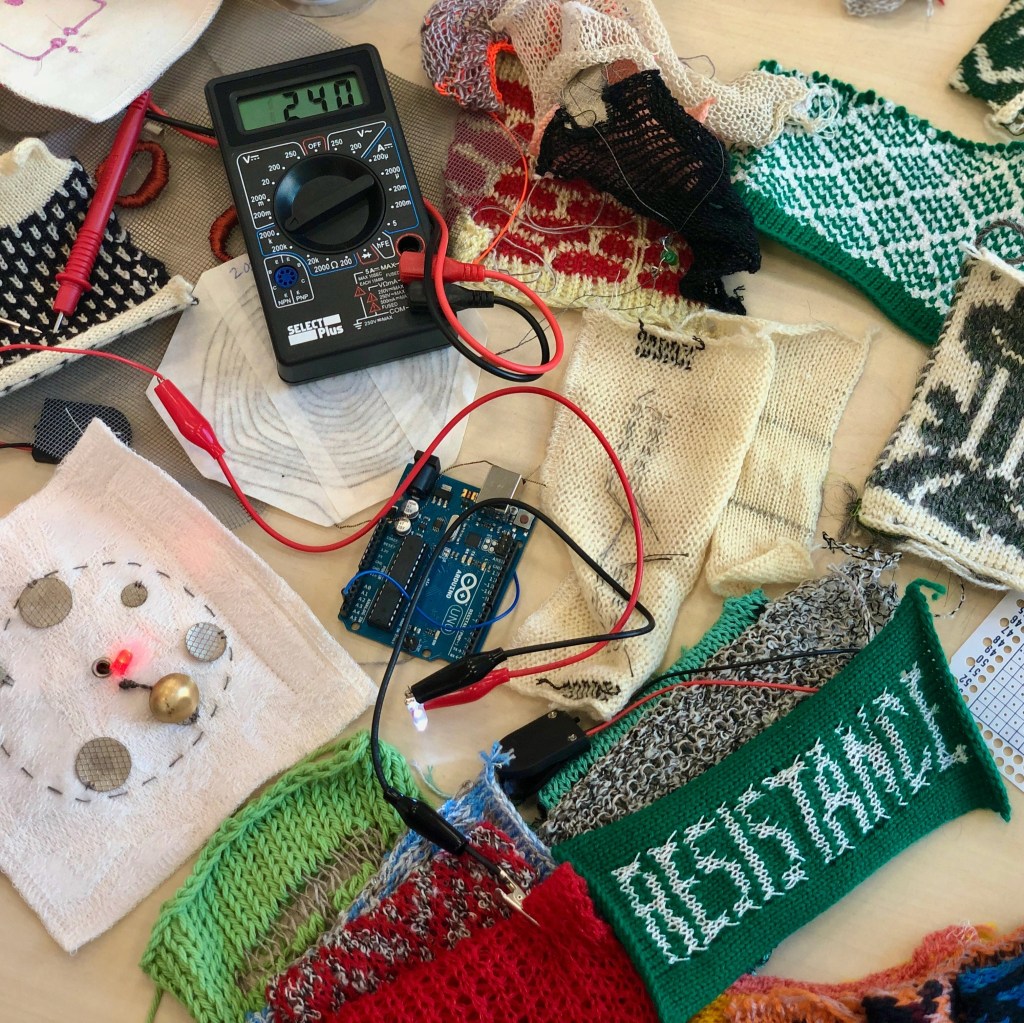
E-Textiles? What?
The world of E-textiles is another rabbit hole in this universe to fall into, and if you want to know more about that you can visit one of our favourite websites for references and project ideas regarding E-textiles you can visit this massive online repository:
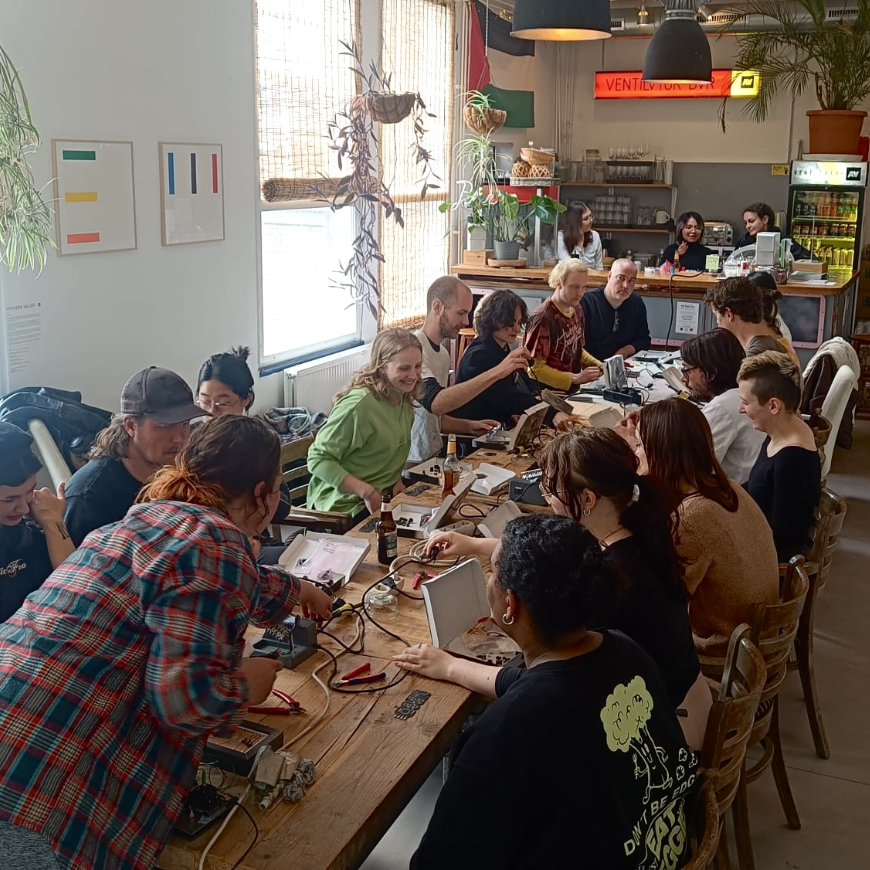
Michelle and Veerle have taken the Atari Punnik Console to various festivals, workshops and cultural gatherings of all sorts over the last year. Some practical information if your interested in a beginner soldering workshop by us:
The Atari Punnik Console can be build in 1-2 hours depending on age and soldering speed
The kit is suitable for ages 12yr and older.
The DIY kit comes with all the components needed, and some extra materials for making your own tactile sensors and conductive interfaces, and a set of alligator clips.
The APC is a great learning tool for young kids and students, where we dive into: the basics of electronics, what it means to make an electronic circuit, how conductivity works and why things work and why they don’t work?
We offer education packages for teachers and self-thought educators for some of the DIY kits so you can solder them with participants, even when we are unavailable to give the workshop ourselves in person. Get in touch with acidsolderclub@gmail.com about this if you’re interested in hosting a soldering workshop using the APC.
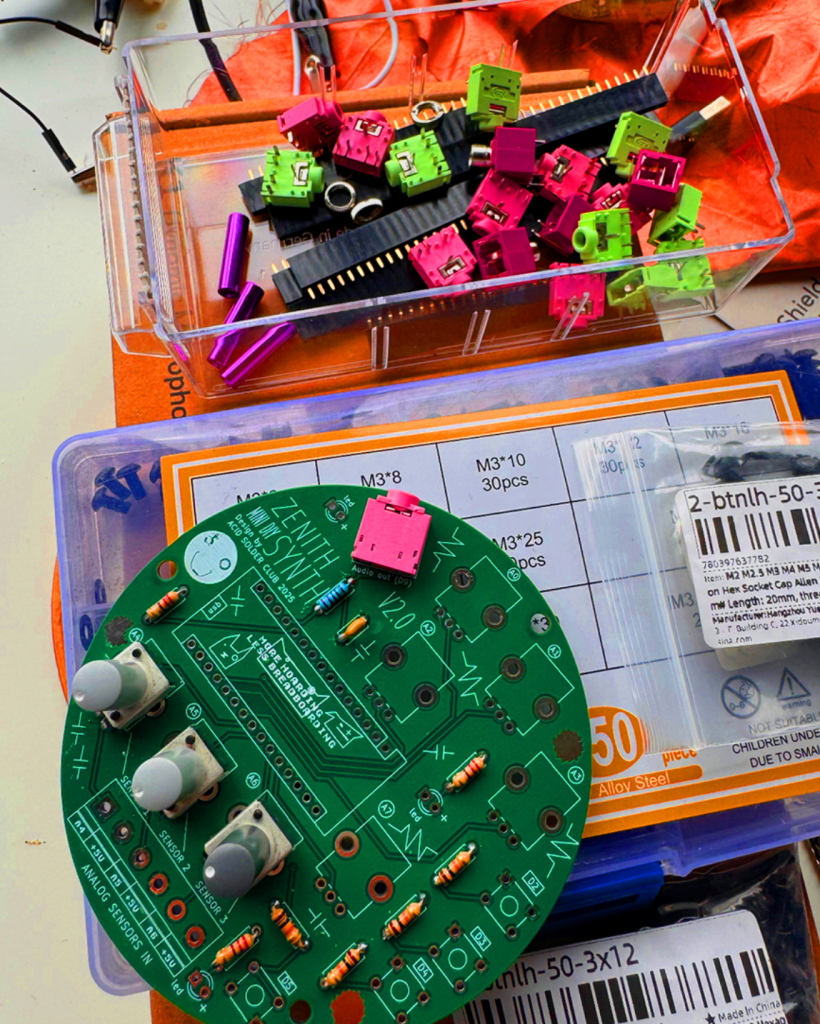
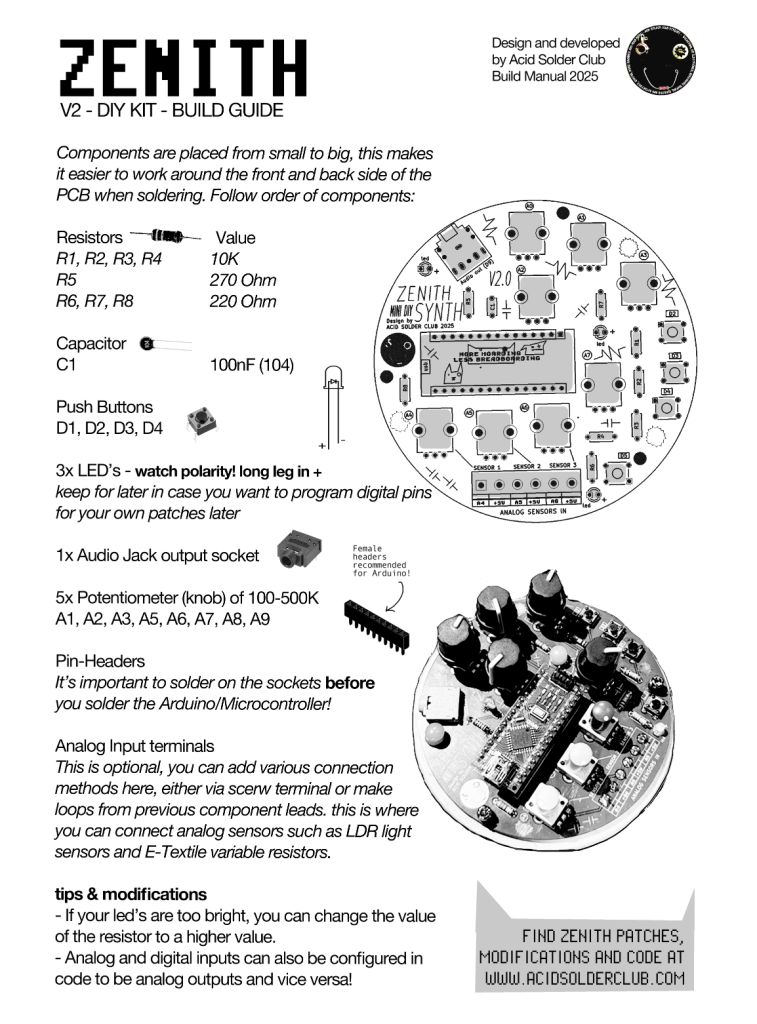
Acid Solder Club’s ZENITH is a standalone diy synthesiser that eliminates the drag and hassle of breadboarding for beginners, who are eager and hyped to solder, design and code their first synth!
Zenith
This portable disk of sonic mayhem comes with an Arduino Nano brain and various components, that easy the way of programming Arduino projects for beginners. ZENITH can be programmed as a sound source, modulation source or controller for led’s and other hardware and comes with audio output jack onboard.
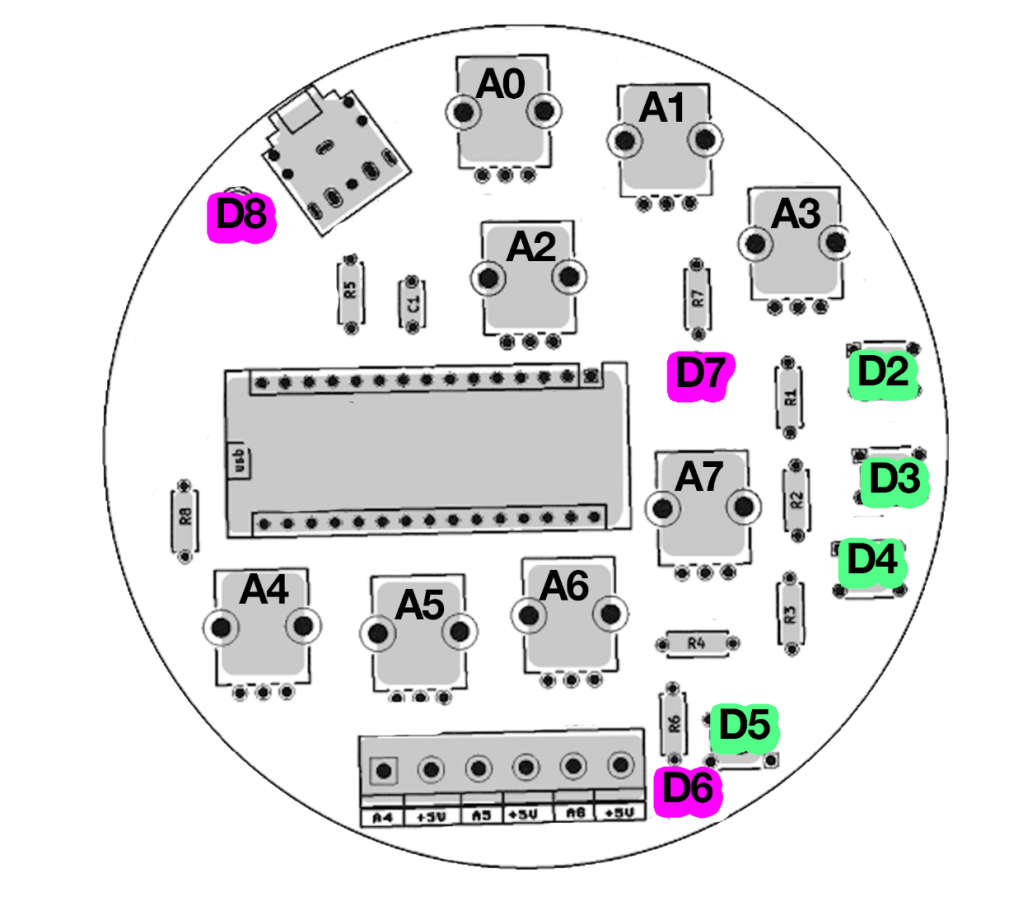
You can program a FM Bass Syntheseizer, Random Arpeggiator or noise source and much more! Zenith contains a set of 5 control potentiometers, and 3 analog input ports that are routed to be used as a voltage divider so you can tweak and adjust the amount of incoming analog sensor data (which is very handy for light sensors/LDR’s). There’s also 4 digital I/O points with switches, and 3 led’s in the basic kit.
The onboard Digital pin connectors can also be used to trigger relays, turn DC motors on and off, control pixel LED’s and it’s kind of skipping all the important electronic breadboarding experience you would be having learning electronics the traditional ways so you can learn and use code with Arduino Nano, without having to drag along a breadboard all the time.
After soldering and following the build guide! Your kit should look like somewhat like this! Use the USB-C power connector of the Arduino Nano to power Zenith.
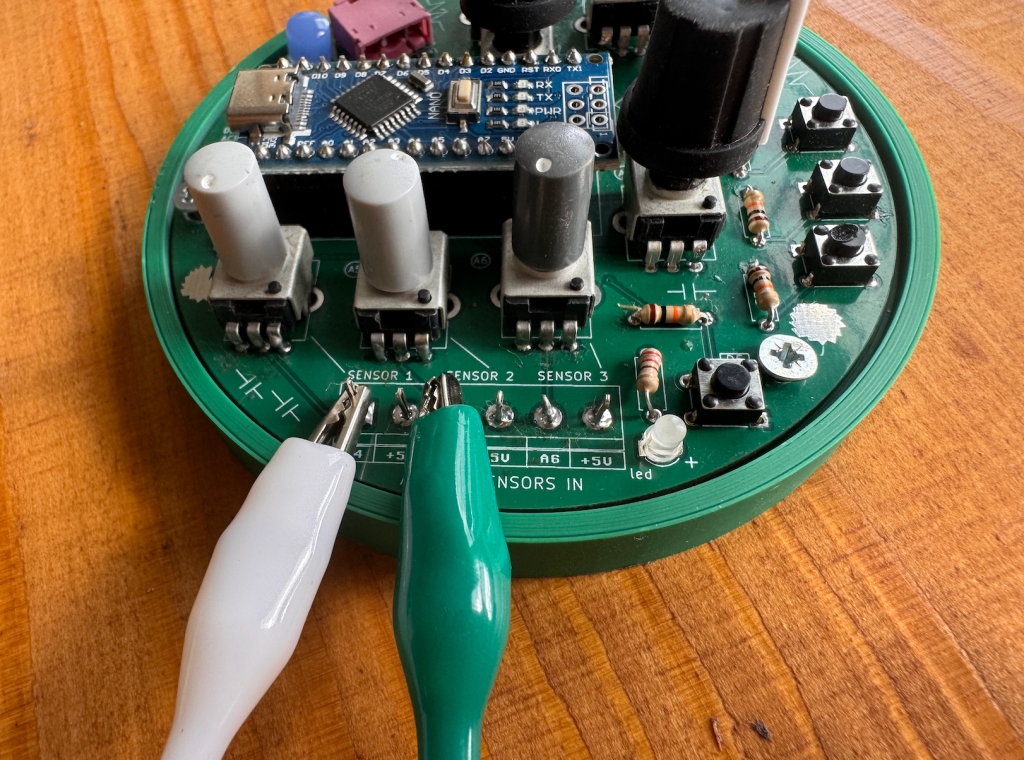
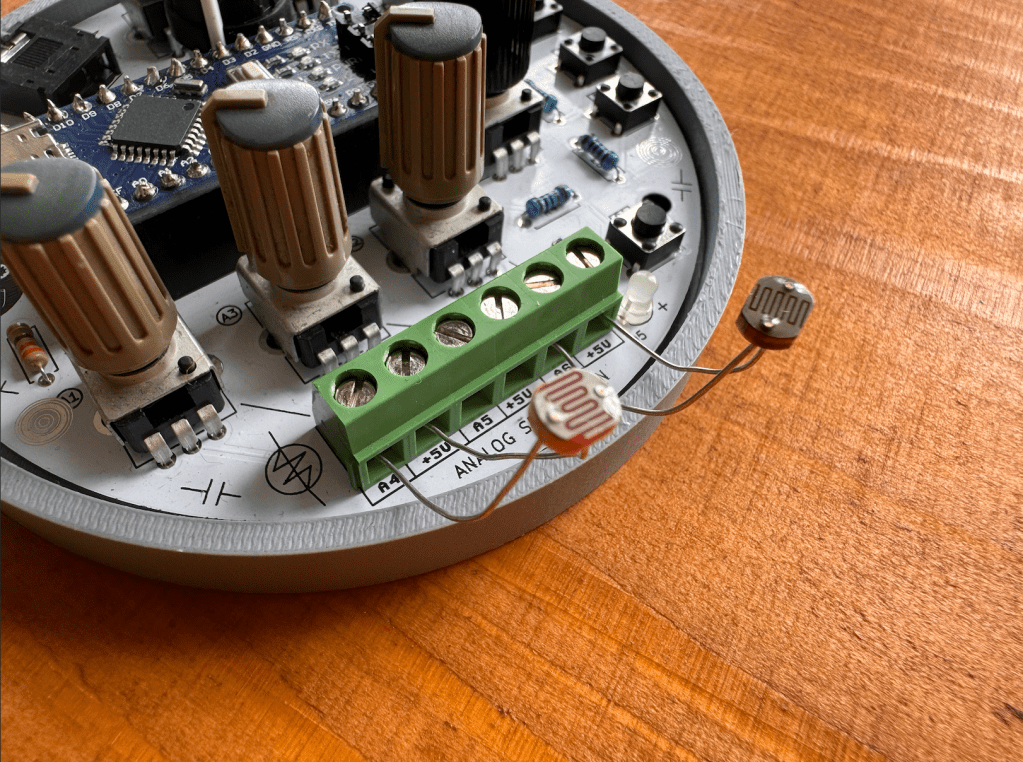
Connectivity Terminals
from the kit, because some people wanted to leave these points open to solder something on later. You can also bend some of your leftover clipped components leads to create pins for connecting alligator clips to! Here you see 2 different ways of connectivity:
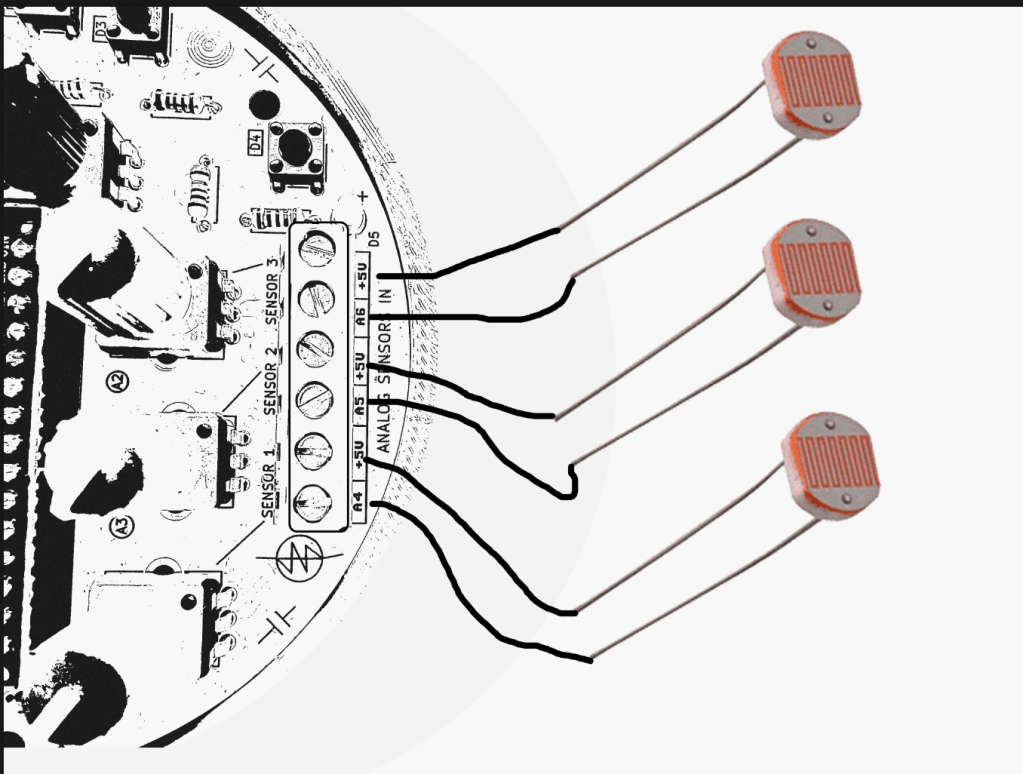
Analog Sensors
Zenith is designed to work well with external use of Analog Sensors, if you’re new to this concept of analog sensing, there’s some nice documentation about this on the Adafruit Analog Input page. The analog sensor input, can pick up changing voltages in sensors such as:
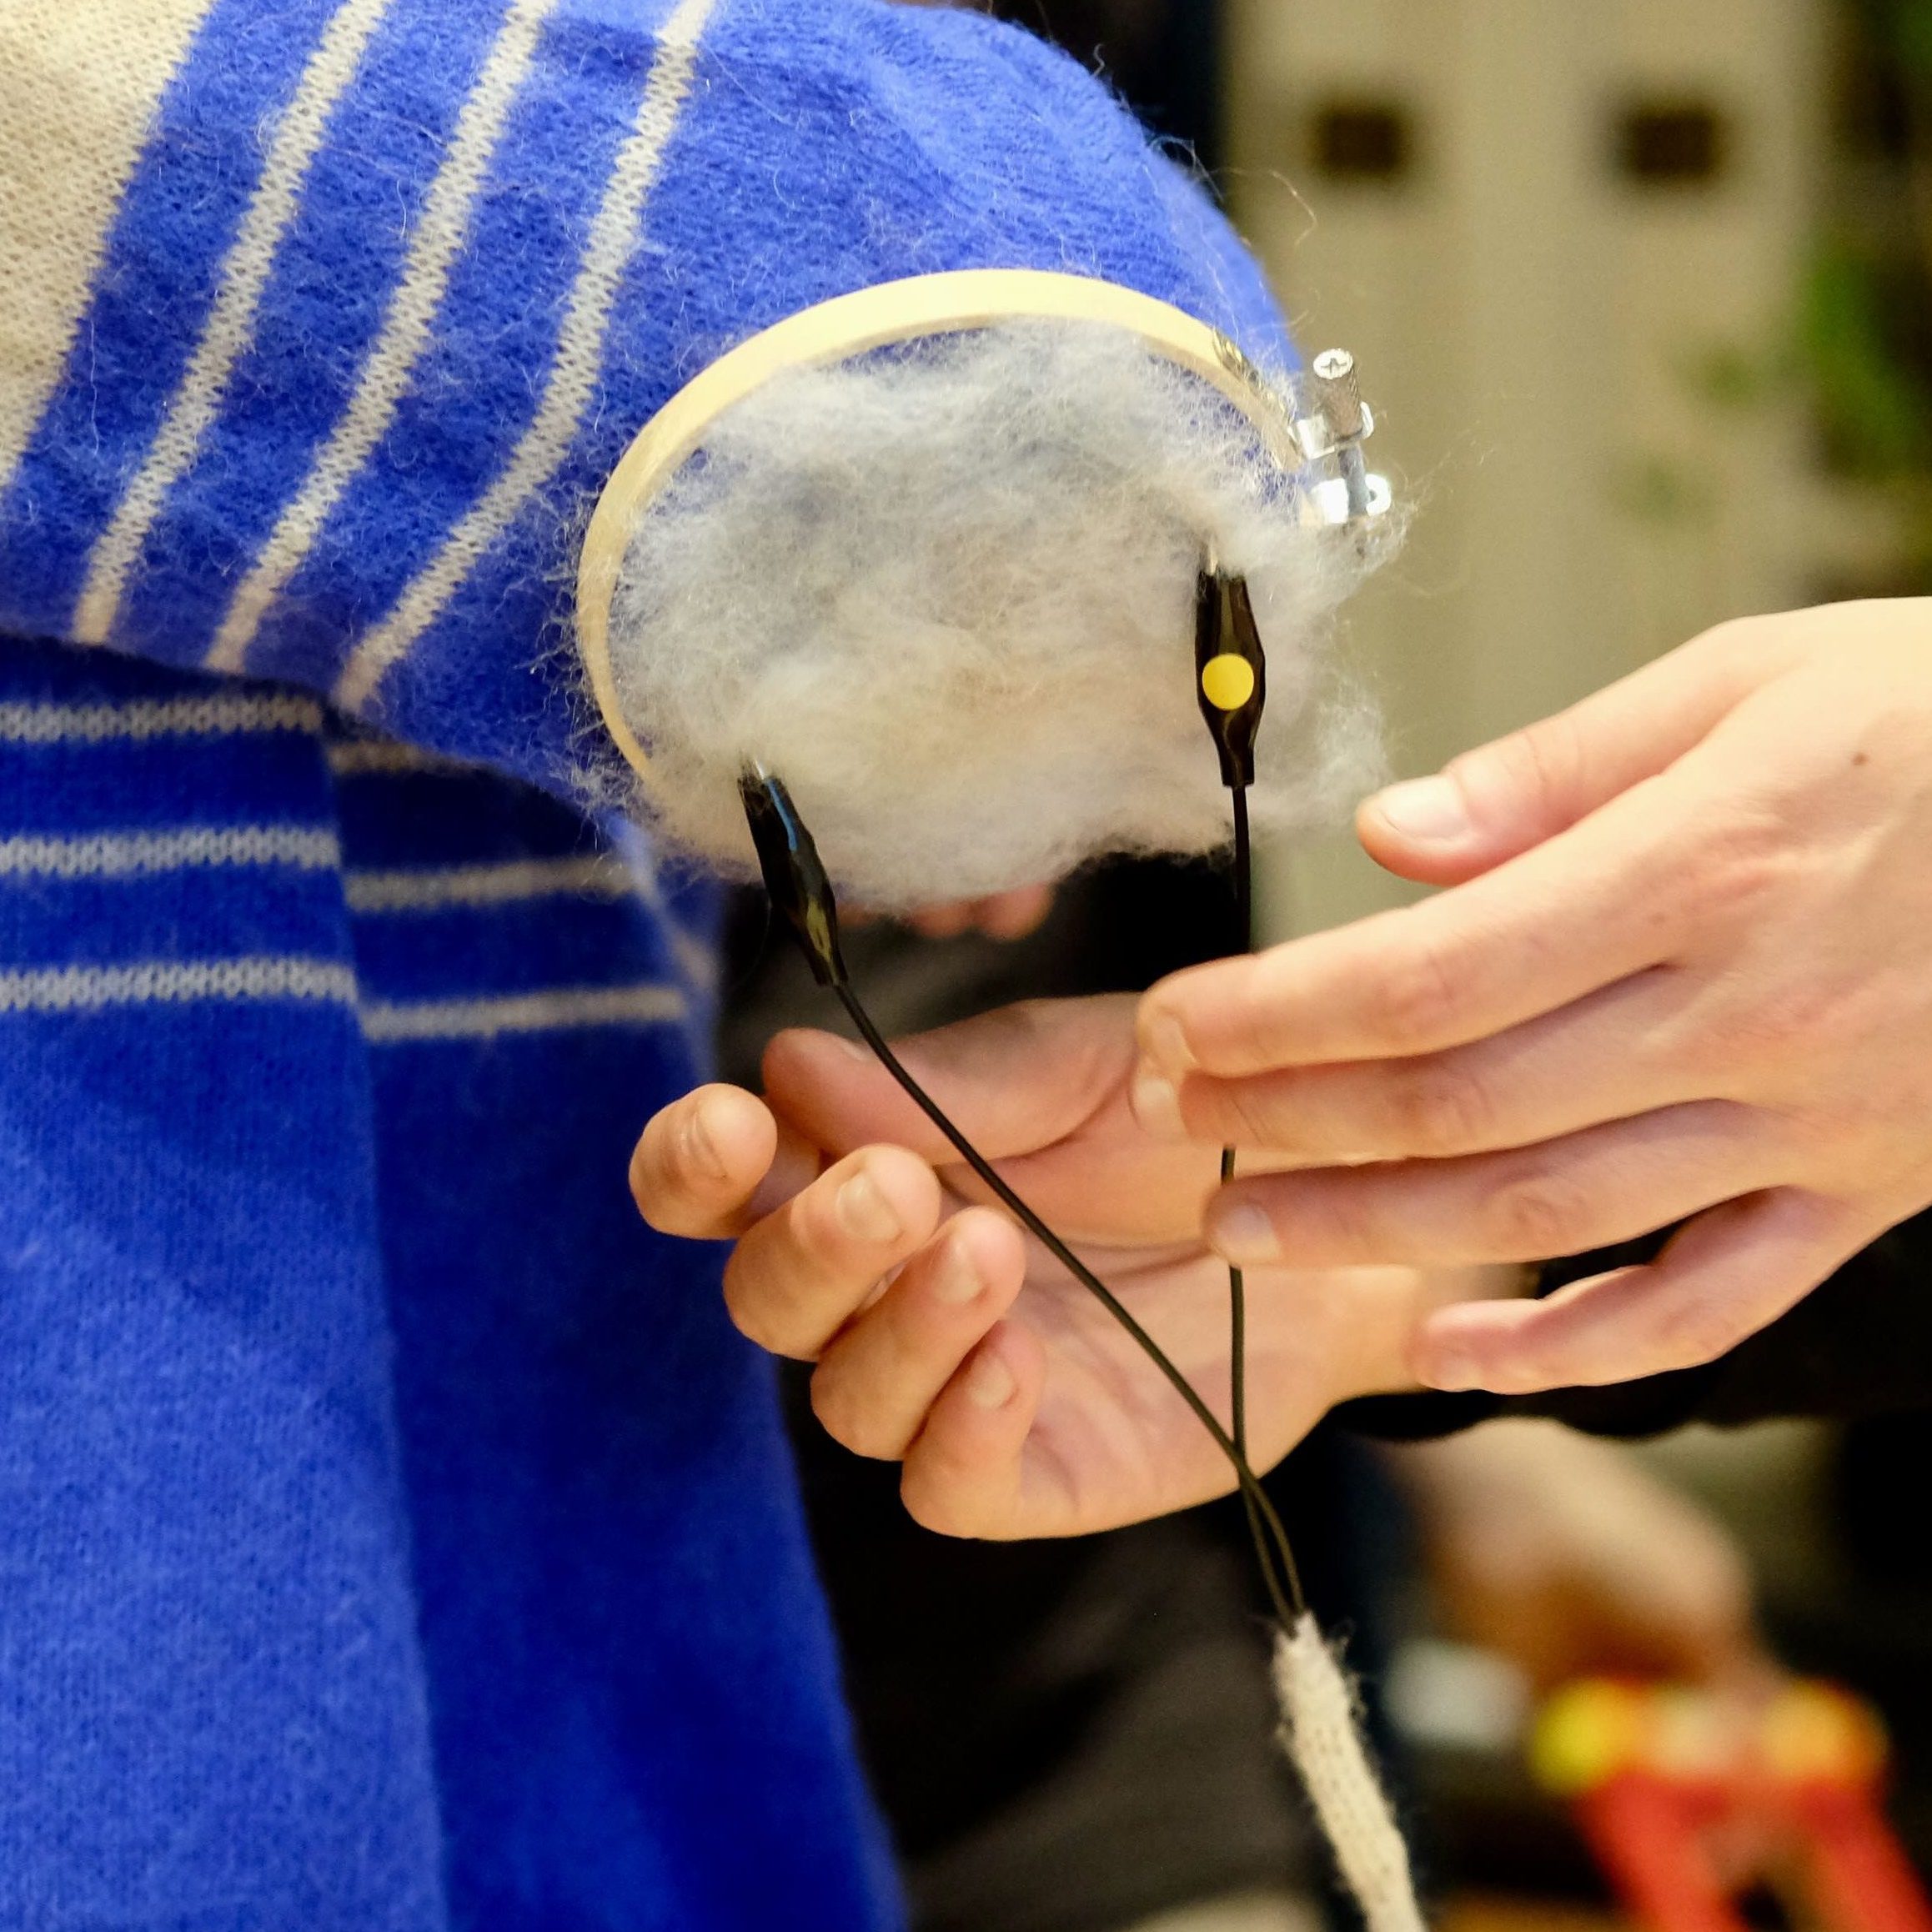
E-Textiles: variable resistors, find a repository of different examples of E-textiles here at Kobakant.
Combinations of conductive and non-conductive materials: such as copper, metals, conductive paint, conductive print filament, charcoal.
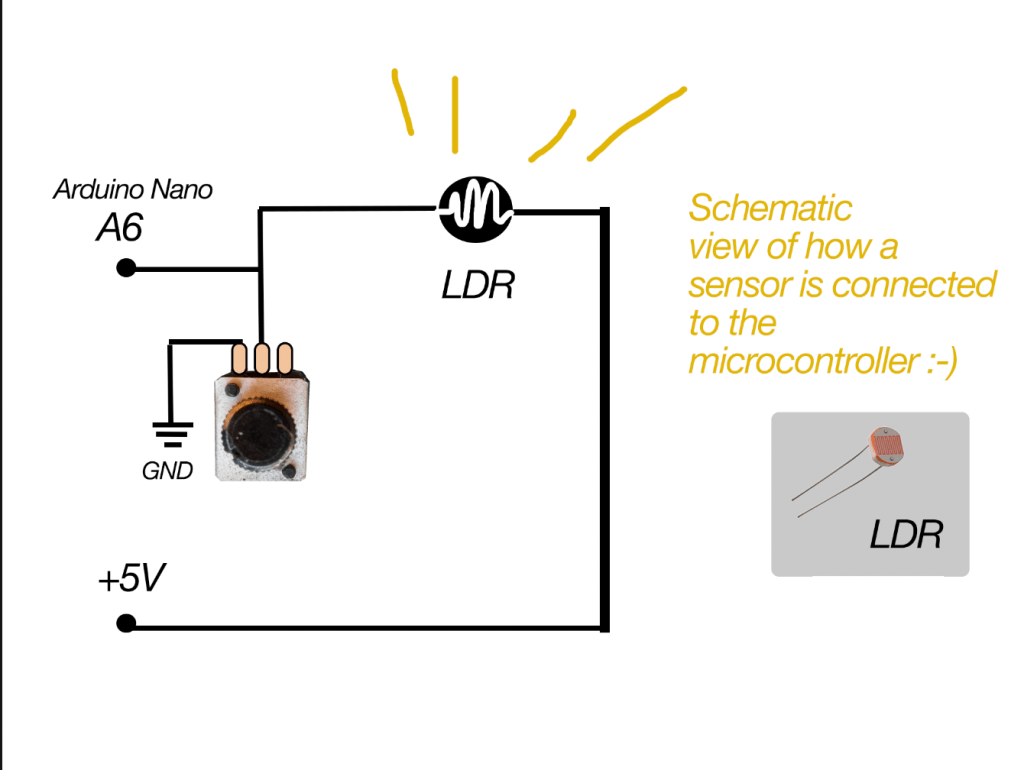
in the schematic representation of Zenith (below) you can see that each sensor input will go trough a potentiometer before connecting to the microcontroller. In this way, the potentiometer acts as a Voltage Divider. Simple explanation: it makes the sensor input variable and adjustable (more or less electricity flow) before it is read by the Arduino. Which is handy if you want to have more or less sensitivity on your sensor.
Always make sure your sensor is connected to the +5V on one side, and the Analog sensor pin on the other side:
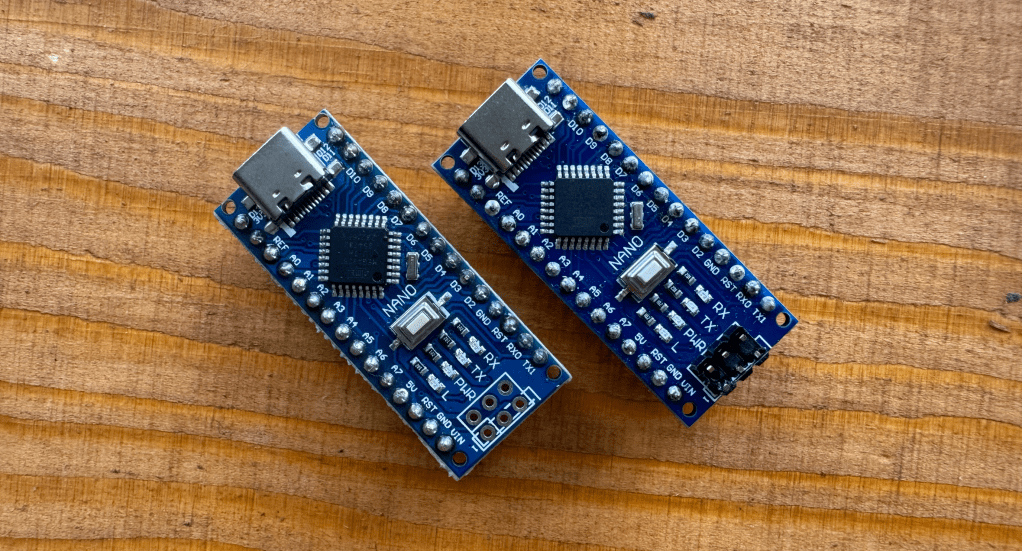
Arduino Nano ADDITIONAL DRIVERS?
This is something that was noticed on a recent DIY kit day where people soldered a Zenith, not all Arduino Nano’s are the same! Some are connectible via USB-C, and they have a different chip on board which means you need to install some additional drivers at home if you want to code with your Arduino Nano.
Some of the Arduino Nano’s are from Hobby Electronica -> here <- and are Arduino Nano’s with USB CH340 onboard, they are compatible with the Arduino IDE and programming environment just like a normal Nano after installing the driver.
These Arduino Boards have an integrated CH340 usb onboard, and this means you have to install some additional Drivers. A driver is an extra piece of software, that allows your computer to “see” the Arduino Nano over usb-c, and accept it as a valid USB microcontroller to program on. Theres detailed instructions on the Hobby Electronica website, you can also find the needed
Download the one you need and your PC has to restart afterwards. Now you should be able to upload on the board without any problems, otherwise send out a message!
In case you have Arduino Nano without the CH340 usb connection, this step is not needed! You will notice if you try to upload the codes if you need drivers, the Arduino IDE will give you an error that is something like: “usb driver not found” or Board not found.
There’s multiple roads to learning how to program with an Arduino, some like to first change numbers around in example codes, others like to follow step by step tutorials breaking down each part of code and hardware after another.
For programming the board one way or the other, you always need some sort of progreamming environment and the most common for Arduino is the ARDUINO IDE. You can also code via the webbrowser and other software but thats for another time.
You can start from scratch and map different parameters of Zenith (potmeters, sensors, switches) to led’s and sound outputs. One of the libraries I’ve used for sound programming is the Mozzi Library. There’s a step by step instruction there and the sound output of ZENITH is PIN 9 for if you want to try out example codes there!
Layout for what is doing what exactly of the code coming soon! so far controls are:
use A0, A1, A2 for controlling the Basssline FM parameters such as carrier wave and modulating wave.
A3 Controls DISTORTION (yay)
A7 control output volume
pushbutton D2 = tap tempo! tap this in different speeds to change the overall tempo.
D3 = short burst of speed change
D4 = pitch octave up!
potentiometers on the bottom A4,A5,A6 are controlling speeds as well and can be modulated by light sensors or be even fancier with this and smack some vactrols on there to be controller by external LFO’s!
Code 2: Pulsating Led’s! More Chaos! even less playability of understanding what is doing what! this is for the noise ones! oh where this ends I dunno… can you wreck it more?
controls are mostly on A0, A1, A2, A3 and A7 for mangling the Amen Break sample such as sample speed, modulating speed, more more more things to glitch and stretch the sample apart till not a lot is left 🙂
BArtpeggio
Code for Zenith made by hardware hacker and super coder Bart Jakobs: a generative Arpeggio for Zenith! Thank to Bart for this amazing patch. Tweak around the main knobs to get interesting involving patterns, trow it through some effects pedals and let this patch tickle your ear buds!
use A0, A1, A2, A3 for controlling the arp parameters.
A7 is controlling the ARP speed
pushbuttons change arp variations and scale!
click noises included ❤
FAQ
Can I add more things to Zenith?
yes, all other unused inputs are possible to use if you have a method to work around the interface. Let your inner hardware hacker go wild
Is Zenith open source?
So far the schematic and code are open source, the kit/pcb is planned to be open source but not yet as for 2025.
Can I follow a class at Acid Solder Club for programming?
YES! this is planned for upcoming months after summer, you can bring your soldered ZENITH or build one on site and there will be multiple basic coding classes for both schools and from the workspace in Utrecht!
Share your own code too! if you have coded something on zenith you want to share let me know via email and I can add it to the patch community folder on the website!
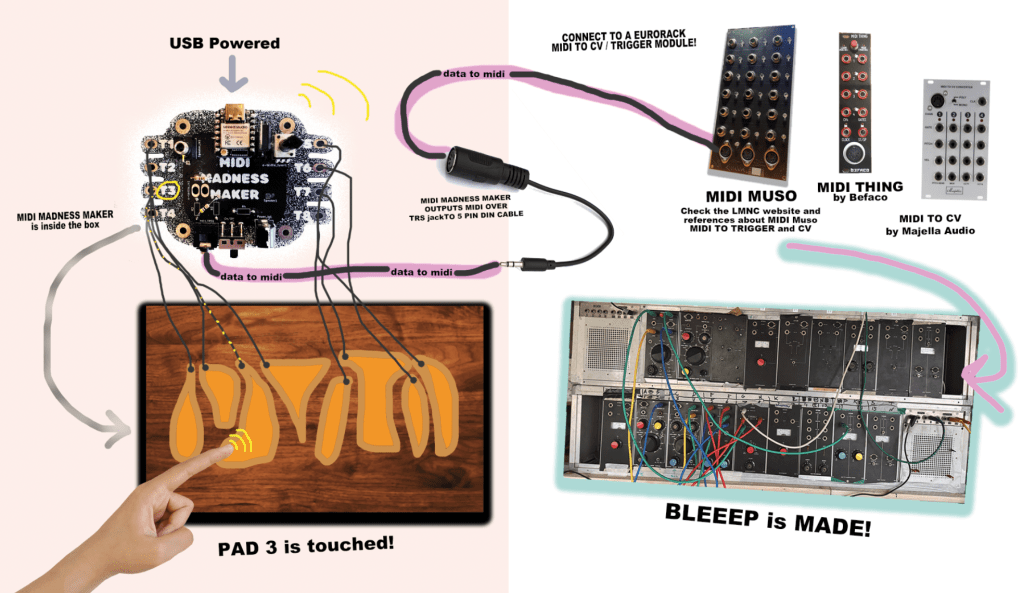
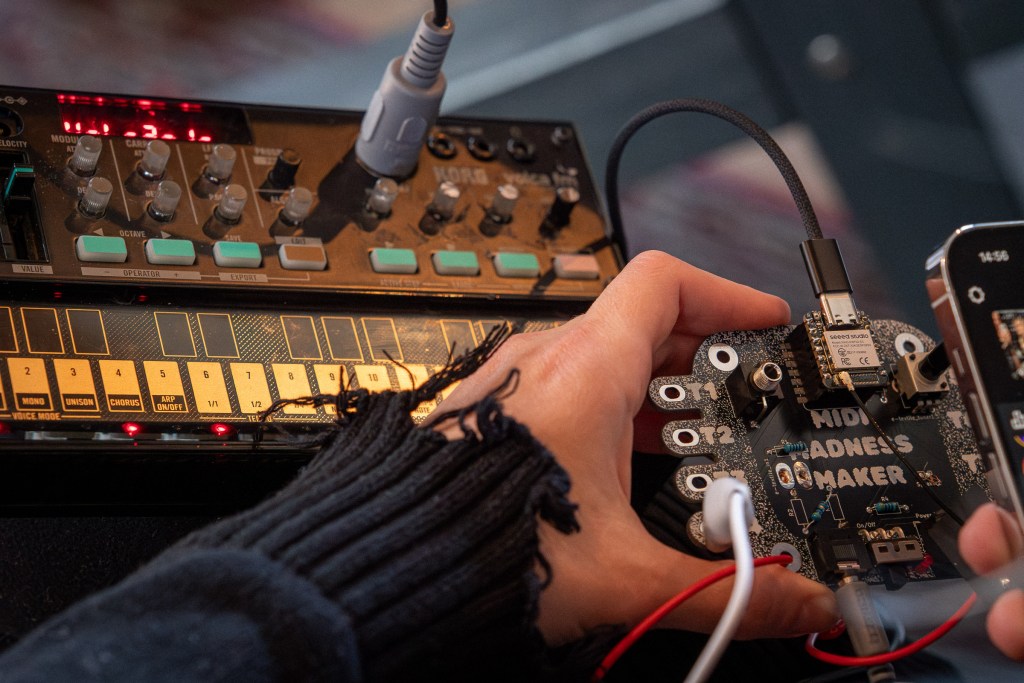
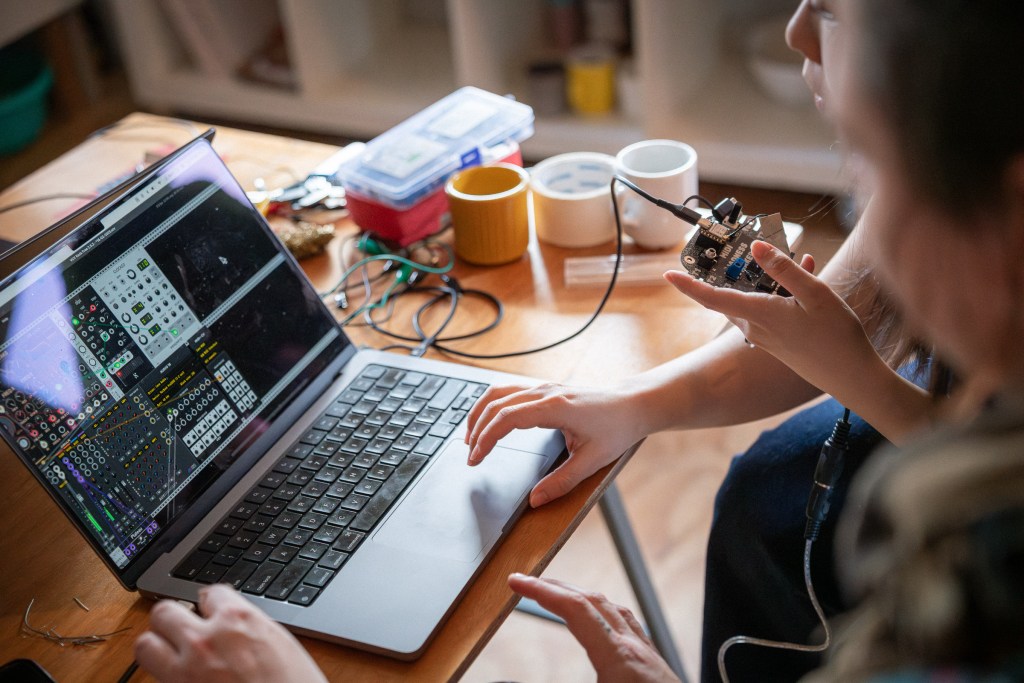
The MIDI MADNESS MAKER, is a standalone DIY syntheseizer and MIDI controller interface you can make yourself with a focus on capacitive touch data. With Midi Madness Maker you can create your own tactile controller translating touch to MIDI control and CC messages over TRS-Midi jack- 5 pin DIN or Wireless over Bluetooth.
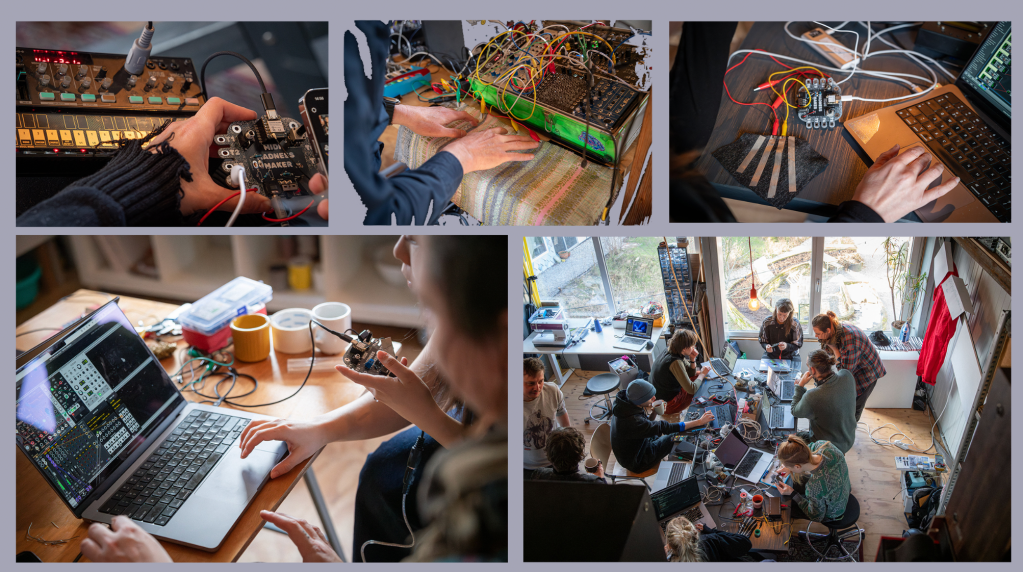
We have made a giant online repository of example codes available for those who want to try things out with the MIDI Madness Maker. In February 2025 we launched the first hackathon where various artist, makers and designers in the field of creative technology, music and interaction build their own kits and interfaces. We are planning more Hackathons and one day workshops in 2025 and 2026, and are working on the V2.0 version that will be in production around august 2025.
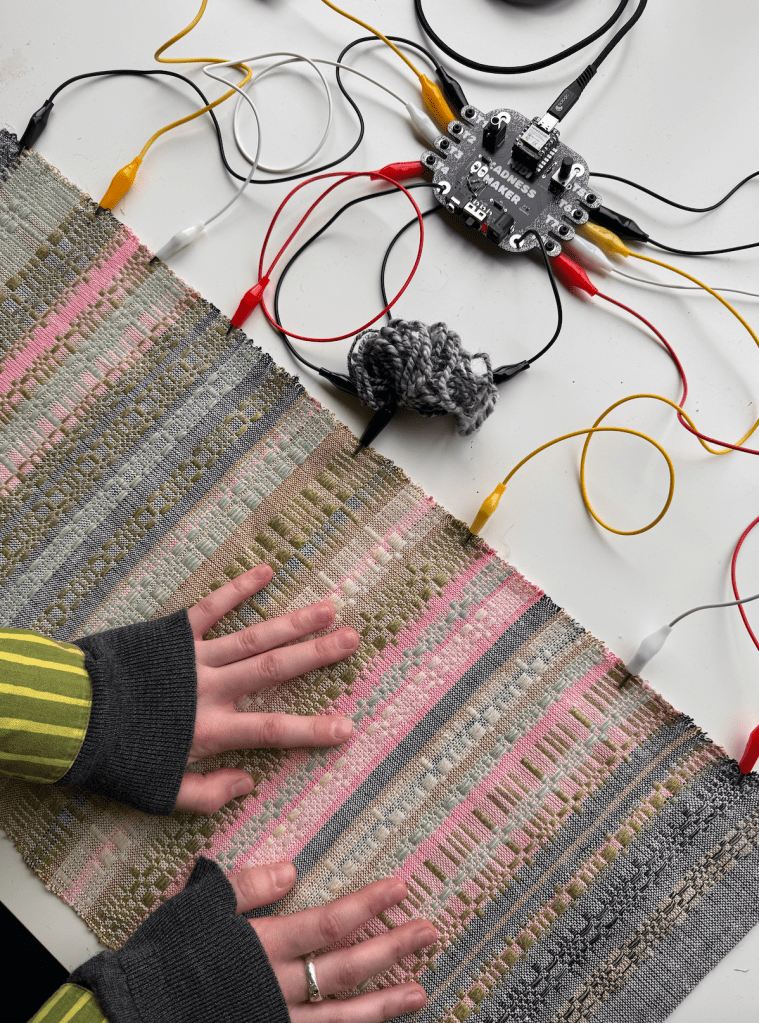
E-Textile Keyboard crafted by Michelle Vossen
BUILD DOCS AND MANUALS
Here you find your page for all the info we’re collecting from Midi Madness workshops and hackathons. Build guides, patch guides and code updates:
What is the midi madness maker made of? The brain runs of a XIAO ESP32 microcontroller and consists of mostly that and a few more other components and utilities, to help out with MIDI-TRS translation and power regulation for external power sources. The Kit is a fairly easy build that can be finished and tested in 1-2 hours (on beginner lvl).
The kit contains a few optional parts, such as the build-on speaker depending if you want that option or output the sound over the Audio Output Jack. Another optional part is the Bluetooth antenna, so far we have had no connectivity issues without it, but for more stable data transfer and farther reach, the antenna is recommended to click on the microcontroller (included in kit)
MIDI MADNESS MAKER EXAMPLES
Modular Synthesiser Touch Controller
Make your own DIY TOUCH controller for modular synthesisers and hardware synths over MIDI trs -DIN connection. For this option you will need some sort of midi to Gate/CV translation module, such as the Befaco Midi Thing V2 (DIY KIT), Majella MCVC or the DIY Project “MIDI MUSO” MIDI to CV soldering kit https://midimuso.co.uk.
Code is fairly simple: you can find the layout of the touch pads of the ESP32 in the Midi Madness Maker repository, or figure them out by searching for the pinout of the microcontroller. Connect your own conductive touch interface to the midi madness maker, and in the code you make use of the Arduino MIDI Library where every time touch happens, it will send a MIDI Trigger or CC blip out over the TRS-mini jack to 5-Pin Din converter. IMPORTANT! There is 2 types of midi in this world, TYPE A ( Korg, MakeNoise) and other TYPE B (Arturia, Polyend) You can find the MIDI type A or B guide here: https://minimidi.world/?
Other Hardware Synthesisers and Drummachines
The sample principle as above (connection wise) is used for controlling hardware synths such as the Roland TR-505, KORG Volca Series, or a pretty Access Virus of your liking. In this case, you will not need a Eurorack Module to translate the MIDI 5 PIN DIN cable to triggers and gates or CV, since this conversion is happening in the hardware devices.
Midi Madness Maker controlling KORG Volca FM
SOFTWARE MIDI CONTROLLER
With the MMM you can also control MIDI related Software connecting and connect your touch board to various DAW’s such as Ableton, Garageband, FLStudio, VCV rack and iPad/tablet apps, that can receive MIDI data.
This can both be used:
by MIDI over USB (usb port of the ESP32)
by MIDI wireless over Bluetooth (Midi Madness Maker is then recognised as a Bluetooth device by your PC or Phone)
This means the MIDI MADNESS MAKER can be used to:
Control Audio Software (Ableton, VCVRack, Mirack, Reaper etc.)
Control Video Software (TouchDesigner, Isadora, Madmapper, Resolume etc.)
Control Light Software (Resolume, QLC+, other DMX software)
other devices that have midi control options and can see Bluetooth or USB MIDI Devices.
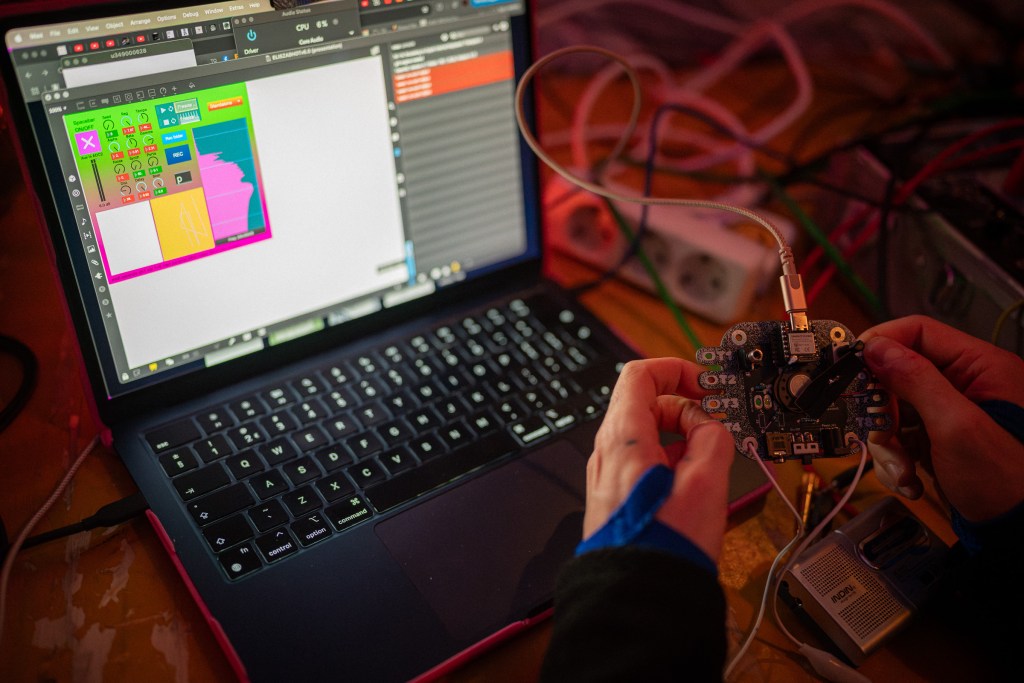
midi madness maker to VCV rack during MMM Hackathon February 2025
MORE INFO
ah so much information to share about this we will put examples out soon on Acid Solder Club YOUTUBEpage and other platforms about user cases and all kinds of cool things to do with the Midi Madness Maker!
Get in touch with us also if you are interested in hosting us for a workshop touch to sound, hackathon or any other event!
Kit design and concept is by Veerle Pennock and Michelle Vossen.


